Jag-Stang Project FINISHED Pg. 6
Moderated By: mods

After sketching a Japanese demon (oni) in the pickup cavity, I went to work this morning on wetsanding. This pic shows the lower area that I sanded with 1500 and the part I hadn't done yet in case any of you are trying your first finish and want to see the difference. Don't worry about it being cloudy. That shines back up when you polish it.

DSC06185 by Hentai No Baka, on Flickr
See the little flecks of shine? You don't want those. Keep going until it is all satin.

DSC06186 by Hentai No Baka, on Flickr

DSC06188 by Hentai No Baka, on Flickr
Once I finished with 1500 and the flecks were gone, I did 2500. (To try to minimize any sanding swirls.) When that was done, it looked like this.

DSC06189 by Hentai No Baka, on Flickr

DSC06190 by Hentai No Baka, on Flickr

DSC06193 by Hentai No Baka, on Flickr

DSC06194 by Hentai No Baka, on Flickr
Then it was polish time. (I use car polishing compound you can get from Autozone.)

DSC06195 by Hentai No Baka, on Flickr

DSC06196 by Hentai No Baka, on Flickr

DSC06199 by Hentai No Baka, on Flickr

DSC06201 by Hentai No Baka, on Flickr

DSC06203 by Hentai No Baka, on Flickr

DSC06206 by Hentai No Baka, on Flickr

DSC06210 by Hentai No Baka, on Flickr
DSC06185 by Hentai No Baka, on Flickr
See the little flecks of shine? You don't want those. Keep going until it is all satin.
DSC06186 by Hentai No Baka, on Flickr
DSC06188 by Hentai No Baka, on Flickr
Once I finished with 1500 and the flecks were gone, I did 2500. (To try to minimize any sanding swirls.) When that was done, it looked like this.
DSC06189 by Hentai No Baka, on Flickr
DSC06190 by Hentai No Baka, on Flickr
DSC06193 by Hentai No Baka, on Flickr
DSC06194 by Hentai No Baka, on Flickr
Then it was polish time. (I use car polishing compound you can get from Autozone.)
DSC06195 by Hentai No Baka, on Flickr
DSC06196 by Hentai No Baka, on Flickr
DSC06199 by Hentai No Baka, on Flickr
DSC06201 by Hentai No Baka, on Flickr
DSC06203 by Hentai No Baka, on Flickr
DSC06206 by Hentai No Baka, on Flickr
DSC06210 by Hentai No Baka, on Flickr
Next I installed the bridge cups (I had to slightly enlarge the holes) and then I screwed down the tremolo. (Oh I also drilled a bridge ground hole and put a ground wire in.)

DSC06211 by Hentai No Baka, on Flickr

DSC06213 by Hentai No Baka, on Flickr
Then I installed the Musicmaster neck. Fit great.

DSC06214 by Hentai No Baka, on Flickr
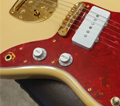
Here it is with a Mustang pickguard on it. (Not using it, just to get a better idea of how it looks.)

DSC06216 by Hentai No Baka, on Flickr
Here you can see where the Mustang guard's curve isn't deep enough for the body.

DSC06217 by Hentai No Baka, on Flickr
I need to get my custom guard made and I also need a Mustang control plate. I think I need a input jack and a blending pot as well. Progress!
DSC06211 by Hentai No Baka, on Flickr
DSC06213 by Hentai No Baka, on Flickr
Then I installed the Musicmaster neck. Fit great.
DSC06214 by Hentai No Baka, on Flickr
Here it is with a Mustang pickguard on it. (Not using it, just to get a better idea of how it looks.)
DSC06216 by Hentai No Baka, on Flickr
Here you can see where the Mustang guard's curve isn't deep enough for the body.
DSC06217 by Hentai No Baka, on Flickr
I need to get my custom guard made and I also need a Mustang control plate. I think I need a input jack and a blending pot as well. Progress!
Small update. The wife accidentally poked the bottom lower side corner of the body. My efforts to sand it out hit wood. Long story short I am having to struggle learning how to drop fill lacquer. I am not liking it. Every time I drop some on, the finish seems to sink in. Not sure how filling will happen at this rate. Been adding drops all this week...
Frustrated.
Frustrated.


stumac
I had a fingerprint in my finish when it was still green. I let it dry, then sanded the print out. This went down to the paint. So I taped off the surounding area with blue painters tape. Then I sprayed the spot with paint, let that dry and then sprayed finish until it was a little higher then the other finish. I kept the painters tape on until I was done spraying (rattle can). Then I wet sanded the spot level.
I had a fingerprint in my finish when it was still green. I let it dry, then sanded the print out. This went down to the paint. So I taped off the surounding area with blue painters tape. Then I sprayed the spot with paint, let that dry and then sprayed finish until it was a little higher then the other finish. I kept the painters tape on until I was done spraying (rattle can). Then I wet sanded the spot level.

That is kind of what I did t first, but the deeper stuff wasn't leveling out, so I have been doing drops in to just the indented area to fill it back up. I am sure it will end up ok. Just frustrating to have a issue that I didn't have anything to do with. lol Trying not to be mad at the wife. Accidents happen.... But damn....
-
theshadowofseattle

- THE TAMPA BAY HERO
- Posts: 62654
- Joined: Thu Apr 20, 2006 3:11 am
- Location: Skrampa, FL
Finished the drop filling. Here it is mostly smooth.

IMG_1099 by Hentai No Baka, on Flickr
Taped it back up and sprayed some more lacquer to help rebuild the surface and level it out more.

IMG_1100 by Hentai No Baka, on Flickr

IMG_1101 by Hentai No Baka, on Flickr
IMG_1099 by Hentai No Baka, on Flickr
Taped it back up and sprayed some more lacquer to help rebuild the surface and level it out more.
IMG_1100 by Hentai No Baka, on Flickr
IMG_1101 by Hentai No Baka, on Flickr
-
taylornutt

- .

- Posts: 4908
- Joined: Thu Sep 17, 2009 5:04 pm
- Location: Dallas, TX
What did you use to wetsand the body? Sandpaper or microfiber mesh pads. I used my Micromesh pads on my 1969 Mustang neck when I refinished it in tinted nitro and it can out fantastic.
J Mascis Jazzmaster | AVRI Jaguar | Tuxedo-stang |Fender Toronado GT |
Squier FSR Sparkle Jaguar | Squier CV Mustang |1971 Fender Bronco| Baja Telecaster |
Squier FSR Sparkle Jaguar | Squier CV Mustang |1971 Fender Bronco| Baja Telecaster |
Repair completed. I am very pleased with how the repair went in the end. Would be extremely hard to tell there was anything repaired there. Now I just need to keep saving to get that pickguard made. I have all the other parts.

IMG_1305 by Hentai No Baka, on Flickr

IMG_1306 by Hentai No Baka, on Flickr

IMG_1307 by Hentai No Baka, on Flickr

IMG_1311 by Hentai No Baka, on Flickr
IMG_1305 by Hentai No Baka, on Flickr
IMG_1306 by Hentai No Baka, on Flickr
IMG_1307 by Hentai No Baka, on Flickr
IMG_1311 by Hentai No Baka, on Flickr
Small update. After several months of saving money only to have a bill come up, I finally got the tort guard ordered. Tony said he will be sending me the guard tomorrow in the mail. Once it gets here, it is assembly time! I have every other part. Can't wait for this to be done. Probably the longest time I have spent on a build. LOL
By the way, it is the red nitro tort with parchment (instead of mint) layers like what WD sells. For those who like their tort, I solute you.
By the way, it is the red nitro tort with parchment (instead of mint) layers like what WD sells. For those who like their tort, I solute you.

Pickguard came today. It looks great!

IMG_2225 by Hentai No Baka, on Flickr

IMG_2226 by Hentai No Baka, on Flickr

IMG_2227 by Hentai No Baka, on Flickr

IMG_2228 by Hentai No Baka, on Flickr

IMG_2229 by Hentai No Baka, on Flickr

IMG_2230 by Hentai No Baka, on Flickr

IMG_2232 by Hentai No Baka, on Flickr

IMG_2235 by Hentai No Baka, on Flickr
So I went to work putting the switches on the guard and pickups. Here is a mockup. (I still need to do the wiring.)

IMG_2241 by Hentai No Baka, on Flickr

IMG_2242 by Hentai No Baka, on Flickr

IMG_2243 by Hentai No Baka, on Flickr
I love how this guitar is shaping up. I would, however, HIGHLY encourage people not to buy bodies from this guy. The gut routes ended up also being off. I had to dremel where the switches are to get them to fit correctly. Won't be visible, but another thing wrong with (Alden?) guitars.

IMG_2244 by Hentai No Baka, on Flickr
IMG_2225 by Hentai No Baka, on Flickr
IMG_2226 by Hentai No Baka, on Flickr
IMG_2227 by Hentai No Baka, on Flickr
IMG_2228 by Hentai No Baka, on Flickr
IMG_2229 by Hentai No Baka, on Flickr
IMG_2230 by Hentai No Baka, on Flickr
IMG_2232 by Hentai No Baka, on Flickr
IMG_2235 by Hentai No Baka, on Flickr
So I went to work putting the switches on the guard and pickups. Here is a mockup. (I still need to do the wiring.)
IMG_2241 by Hentai No Baka, on Flickr
IMG_2242 by Hentai No Baka, on Flickr
IMG_2243 by Hentai No Baka, on Flickr
I love how this guitar is shaping up. I would, however, HIGHLY encourage people not to buy bodies from this guy. The gut routes ended up also being off. I had to dremel where the switches are to get them to fit correctly. Won't be visible, but another thing wrong with (Alden?) guitars.
IMG_2244 by Hentai No Baka, on Flickr


 (she/they)
-
Leather Jacket
- .

- Posts: 142
- Joined: Thu Oct 18, 2012 1:36 am