Metallic Black Duo-Sonic Build
Moderated By: mods


So a brief catch up.
How it came to Punk.

8278636683_c8fb88bd4f_o by Hentai No Baka, on Flickr
Repaired by Cooter.

8278638511_520d7b53e5_o by Hentai No Baka, on Flickr
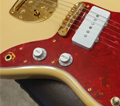
Above is how it came to me with a red tortoise guard, pickups, switches, and bridge. I need to get a control plate, jack, and knobs still.
The first thing I did is sand more paint off. I planed on painting over the finish and using it as primer but that yellow paint was peeling off like dead skin, so it had to go.

IMG_3708 by Hentai No Baka, on Flickr
This is what was under there.

IMG_3709 by Hentai No Baka, on Flickr

IMG_3710 by Hentai No Baka, on Flickr

IMG_3711 by Hentai No Baka, on Flickr
I left some white around the horns and on the side because it was smooth and no flaking off. Here it is with it's neck.

IMG_3712 by Hentai No Baka, on Flickr
Since I am going to seal and spray anyways and the holes on the guard didn't match 100%, I just figured I would fill those and drill fresh ones once the painting is finished.

IMG_3713 by Hentai No Baka, on Flickr
Once dry, I will cut them flush and lightly sand them flat before I work on sealing.

IMG_3714 by Hentai No Baka, on Flickr
How it came to Punk.
8278636683_c8fb88bd4f_o by Hentai No Baka, on Flickr
Repaired by Cooter.
8278638511_520d7b53e5_o by Hentai No Baka, on Flickr
Above is how it came to me with a red tortoise guard, pickups, switches, and bridge. I need to get a control plate, jack, and knobs still.
The first thing I did is sand more paint off. I planed on painting over the finish and using it as primer but that yellow paint was peeling off like dead skin, so it had to go.
IMG_3708 by Hentai No Baka, on Flickr
This is what was under there.
IMG_3709 by Hentai No Baka, on Flickr
IMG_3710 by Hentai No Baka, on Flickr
IMG_3711 by Hentai No Baka, on Flickr
I left some white around the horns and on the side because it was smooth and no flaking off. Here it is with it's neck.
IMG_3712 by Hentai No Baka, on Flickr
Since I am going to seal and spray anyways and the holes on the guard didn't match 100%, I just figured I would fill those and drill fresh ones once the painting is finished.
IMG_3713 by Hentai No Baka, on Flickr
Once dry, I will cut them flush and lightly sand them flat before I work on sealing.
IMG_3714 by Hentai No Baka, on Flickr
Plugged holes were trimmed, sanded, and now the front of the body has sealer applied. Tomorrow I can seal the back.

IMG_3717 by Hentai No Baka, on Flickr

IMG_3716 by Hentai No Baka, on Flickr
IMG_3717 by Hentai No Baka, on Flickr
IMG_3716 by Hentai No Baka, on Flickr
Back is sealed! Now it will sit for a bit because I fly to Japan tomorrow morning and won't be back for a few weeks.

IMG_3718 by Hentai No Baka, on Flickr

IMG_3719 by Hentai No Baka, on Flickr
IMG_3718 by Hentai No Baka, on Flickr
IMG_3719 by Hentai No Baka, on Flickr
First coat of black (as a primer) is done. Once it is dry (maybe tomorrow) I will lightly sand it to prep it for a second coat of black.

IMAG1746 by Hentai No Baka, on Flickr

IMAG1747 by Hentai No Baka, on Flickr
IMAG1746 by Hentai No Baka, on Flickr
IMAG1747 by Hentai No Baka, on Flickr
-
taylornutt

- .

- Posts: 4908
- Joined: Thu Sep 17, 2009 5:04 pm
- Location: Dallas, TX
Normally I wait until the very end, but with this one I am going to try to get the black sanded smooth because I might do a metallic final coat and that stuff looks best on a smooth surface.  I did try one time wetsanding every coat and every coat had new orange peel so I don't think it really helps in the end from what I have seen. (Other than if you are applying a metallic finish.)
Coat number two. Tomorrow morning I will lightly sand again for coat number three. Smoothing out a lot.

IMAG1748 by Hentai No Baka, on Flickr

IMAG1749 by Hentai No Baka, on Flickr
IMAG1748 by Hentai No Baka, on Flickr
IMAG1749 by Hentai No Baka, on Flickr