Damn you work fast, it usually takes me weeks and months of fretting and procrastination before I can do the slightest of things, like moving from 220 grit to 320. Very nice wood and stain.
I like the traditional tele cup, what I really like is that 45 dollar Rutters press fit cup, I wish some one would knock that off
Work is good because it keeps me from rushing to an extent. Normally I would have done another coat this morning, but I had to get to work so I will only do a coat on one side every 24 hours which is slower than the instructions, but helps make sure the layers are solid before I add more. I am thinking one more coat all around should do it. (Three total.) Then I will gently sand it and start putting tru-oil on. If it doesn't look nice and flat, I will do a fourth coat and even a fifth. I am putting it on very thin to avoid liquid bubbly resin that I would end up having to sand off. For the next coats, I will thin it with denatured alcohol so it will apply flatter.
So I learned something about tru-oil. (The hard way of course.)
I was putting it on with a plastic glove and spreading it all over. I found out I was putting it on too thick. It was drying with liquid bumpy bits and such. I sanded it flat (which I wouldn't have needed to do if I had done it right) and applied it using a paper towel. Basically I am now rubbing it on instead of putting it on the body and spreading it around. Seems to be working better this way. Dries faster as well.
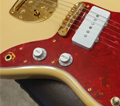
Here are some updated pictures. I got the neck on, neck pickup added, switch wired, electrostatic cup attached, and pickguard ready for the screws. I am still waiting on the string ferrules for the back of the body, the string tree, toggle switch tip, and pickguard/control plate screws. I used some fun quirky knobs on it. I like that the black plays off of the guard and bridge pickup.


 IMG_7090 by Hentai No Baka, on Flickr
 IMG_7091 by Hentai No Baka, on Flickr
 IMG_7092 by Hentai No Baka, on Flickr
 IMG_7095 by Hentai No Baka, on Flickr
 IMG_7093 by Hentai No Baka, on Flickr
 IMG_7228 by Hentai No Baka, on Flickr
 IMG_7276 by Hentai No Baka, on Flickr
 IMG_7277 by Hentai No Baka, on Flickr
 IMG_7278 by Hentai No Baka, on Flickr
 20140630_165052 by Hentai No Baka, on Flickr
 20140630_165058 by Hentai No Baka, on Flickr
 20140630_165107 by Hentai No Baka, on Flickr
 20140701_134332 by Hentai No Baka, on Flickr
 20140701_134338 by Hentai No Baka, on Flickr
 20140701_143535 by Hentai No Baka, on Flickr
 20140701_143544 by Hentai No Baka, on Flickr
 20140701_143554 by Hentai No Baka, on Flickr
 20140701_143612 by Hentai No Baka, on Flickr
 20140701_143623 by Hentai No Baka, on Flickr