Enlarging pickguard pot holes?
Moderated By: mods
-
johnnyseven
- .

- Posts: 3998
- Joined: Sun Jun 03, 2007 2:42 pm
- Location: London, England
Enlarging pickguard pot holes?
What's the best way to do it? Will emery cloth do the trick? My new CTS pots won't fit in the holes on my pickguard.
-
theworkoffire
- .

- Posts: 65
- Joined: Wed Nov 19, 2008 1:16 pm
- Location: London

A bit of sandpaper wrapped around a cylinder, like a pen. Ideally you want something that is fairly close to being the right size but still leaves a gap around the edges so you still have control.
Before you start use a marker pen to draw a thin, even line around the edge of the hole so that you enlarge it equally in all directions. If you don't trust yourself to draw the line evenly or accurate enough then make a hole in some paper that's the right size and use that as a stencil to line up over the existing hole before you mark the area to remove.
Before you start use a marker pen to draw a thin, even line around the edge of the hole so that you enlarge it equally in all directions. If you don't trust yourself to draw the line evenly or accurate enough then make a hole in some paper that's the right size and use that as a stencil to line up over the existing hole before you mark the area to remove.
Shabba.


-
johnnyseven
- .
- Posts: 3998
- Joined: Sun Jun 03, 2007 2:42 pm
- Location: London, England
-
hotrodperlmutter

- crescent fresh
- Posts: 16665
- Joined: Sat Apr 04, 2009 10:29 pm
- Location: Overland Park, KS, USA
-
SKC Willie

- Bunk Ass Fuck
- Posts: 3465
- Joined: Thu Nov 05, 2009 5:46 pm
- Location: Columbia, MO
- Contact:


The best way is with a stepped sheet material bit, like this:
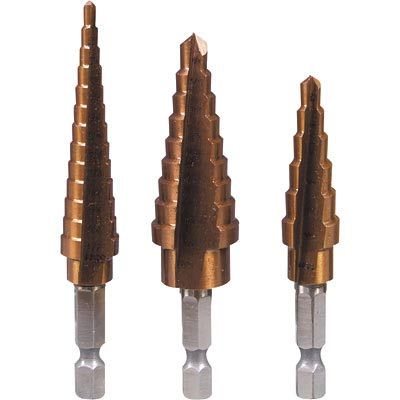
These are available at larger hardware stores and home centers.
Before I started using these, I struggled drilling plastic with twist bits, and for about 20 years I then used Forstner bits. To do a good job with twist drills or Forstner bits, you preferably should use a drill press and back the plastic with something solid like plywood or MDF. Still, the wrong speed or too much pressure, and you're liable to chip or crack the plastic.
God forbid you should ever try drilling a hole over about 1/8" diameter in plastic with a hand drill or without backing up your piece.
These stepped drill bits are graduated in 1/16" increments, and do a fantastic job of drilling holes up to 1" in diameter in any thin sheet material including aluminum, brass, plexiglass, styrene, and pickguard materials of all kinds. They work with a small pilot hole on center to get them started, can be used with a hand drill, are very controllable, won't chip or crack, and don't need backing for the hole. I typically use them holding the guard in one hand and the drill in the other, in free air; no table or drill press required. Results are 100% pro.
Worth the investment--like having a complete set of bits from 1/8" to 1" in two or three bits.
-
honeyiscool

- .

- Posts: 2072
- Joined: Tue Feb 01, 2011 11:36 pm
- Location: San Diego, California

Get a reamer. It's the best $8 investment you can ever make for guitar modification. So much more civilized than a drill bit. Also useful for tuner installation.
Another thing I like to use it for rear routes, where I will use a piece of cardboard, ream out three or four holes with a reamer, and wire all the basics there before transferring it to the guitar.
Kicking and squealing Gucci little piggy.


Judging from the title, this thread exists to share tips on what are the proper tools for the job. The "Guitar Projects" section of this site shouldn't just be a "show and tell" of finished projects or projects-in-progress, but also a "how to" on skills and techniques that we all use in our projects.
Skills in this group seem to range from "crash and burn, get it done cheap and quick", to a great degree of sophistication and willingness to share knowledge.
No matter. Those of us with greater respect for the right tools and craftsmanship, as well as those of us who'd rather play than make sawdust, still can share our knowledge with others, as long as we remain respectful and open-minded and keep our senses of humor.
Sorry to go all literal and humorless for a second. It's early in the morning there and my smartass hasn't kicked in yet.
Rob, I watched a video of you using a dremel on a pickguardrobroe wrote:i use a counter sink with a power drill or dremmul if you got one. counter sink one side, then do the back. shape to fit. takes 2 seconds and no fucking elbow greeese

Joey wrote: You know what all people who drill out headstocks say after they finish... "I shoulda used a reamer".
This. I don't think I even knew what a reamer was when I drilled my 90s duo headstock, I didn't quite get away with it..oh well learning curve and all that.
obscure pop culture reference
Joey wrote:Yes, but a tapered reamer such as you show, is intended for use on sheet metal. The type of reamer that I use for tuner holes looks like this:DGNR8 wrote:+2 DGNR8honeyiscool wrote:
Get an reamer./quote]
+1. Reamed! I have used mine for tuner holes too.
You know what all people who drill out headstocks say after they finish... "I shoulda used a reamer".
and is ground to the exact size of the tuner bushing or post that fits into it. When I'm finished painting and buffing a guitar, the tuner holes are inevitably edged and partially filled with paint and buffing gunk. Last act before installing the tuners is to ream out the holes with one of these straight reamers chucked in a cordless drill. They're like drill bits without any twist, so they remove material without grabbing.
