Page 6 of 12
Posted: Mon Oct 25, 2010 9:48 pm
by SKC Willie
Bill Oakley wrote:Here you go. If you need anything else, just ask. How are you doing the board? Etching, strip, perf?

I think I may of asked this but where exactly did this schematic come from? I am trying to figure out how to lay out the parts and take up as little space as possible. I ordered my casing and it is small. I think can make it fit but I do have to be conscious of how I layout the pedal.
Posted: Mon Oct 25, 2010 10:06 pm
by Bill Oakley
I drew it up. Why? What are you looking for? A layout?
Posted: Mon Oct 25, 2010 11:28 pm
by SKC Willie

something like this would be awesome but beggers can't be choosers. I'm just trying to figure out what would be the best way, wiring point to point, to layout everything out so it will still fit in my enclosure.
Posted: Tue Oct 26, 2010 12:26 am
by Bill Oakley
Point to point/turret board probably isn't the best way to get a small layout.
What size enclosure are you using?
If you want to give your own layout a go, try
DIY Layout Creator. It's free and there hardly is any learning curve. You can do PCB, strip or perfboard layouts on it.
A little more advanced way to go is with Cadsoft Eagle's free version. A MUCH bigger learning curve here though. There is tons of other free software also.
If I have time tonight or tomorrow, I'll do a perfboard or stripboard layout for you since it doesn't seem like you are going to etch a board (By the way, I can etch a board for you if you wanted me to).
Posted: Tue Oct 26, 2010 12:39 am
by SKC Willie
Awesome! That will definitely help!
I've been looking for something like this but this is exactly what I was looking for. Thanks!
Posted: Tue Oct 26, 2010 12:44 am
by Bill Oakley
What size enclosure are you using so if I get a chance to do a layout, I know what to aim for?
Also, if you want to do a layout with the DIYLC and post it here, we can help check it and make some suggestions. The program exports an image so it's really easy.
Posted: Tue Oct 26, 2010 1:13 am
by SKC Willie
4.37" X 2.37" X 1.07"
I can put the knobs pretty close together as well. I have mini-pots and small knobs.
Posted: Tue Oct 26, 2010 2:35 am
by Bill Oakley
I would suggest a larger enclosure for your first build but I can help you fit it in there.
Posted: Tue Oct 26, 2010 4:49 am
by SKC Willie
Yeah, looking back I wish I would have ordered a bigger enclosure but this has already arrived.
Also, do you use that program? I am having a hard time with it. Once you make a connection, on accident or purpose, I have a hard time deconnecting it with screwing everything up.
Posted: Tue Oct 26, 2010 5:10 am
by Bill Oakley
Hold the Shift button when you move things. It will take a little bit to get used to it but it's probably the easiest one to use. Save often and Ctrl-Z is undo.
Posted: Tue Oct 26, 2010 5:31 am
by SKC Willie
I'm running it on a Mac and a lot of the basic feature are weird. For example Command Z is undo on ALL applications but on this program it is still ctrl Z. Just a quirky program I'm trying to figure out.
Posted: Tue Oct 26, 2010 6:56 am
by Bill Oakley
You can also turn Sticky Points off in the settings tab.
I'll do a perfboard layout for you really quick using DIYLC.
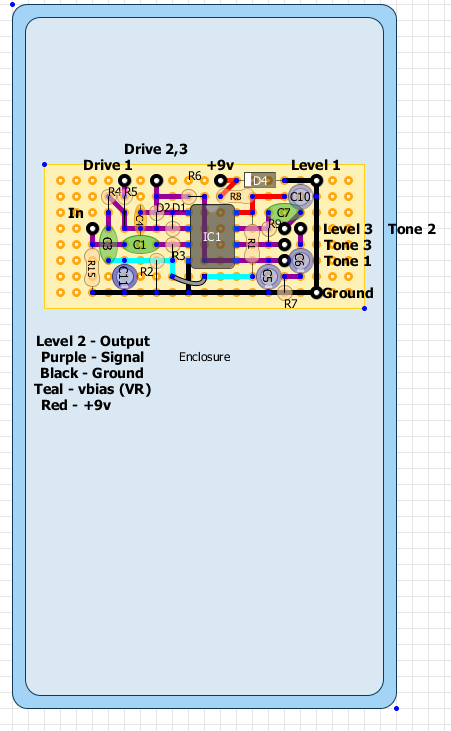
Edit: Here is a perf layout for you. I made it as small as I could. I did it really quick so check it against the schematic I posted for any errors. I only did 2 clipping diodes for symmetrical clipping. If you want asymmetrical clipping, add the third one. The reference in the layout is the same as the schematic (i.e. R1 in the schematic is R1 in the layout).
If you want the origianl DIYLC file, I can email it to you if you PM me your email address. That way you can play around with the layout.
Posted: Tue Oct 26, 2010 9:06 pm
by SKC Willie
AHHHHHHH!
We forgot to order the op amp, so it is looking like it will be another week before I can physically start building this thing. although, my friend has an extra TLO72cn Dual Op Amp. If I wired this in temporarily, how would that change the sound? I'm probably going to just wait until the right one comes in (it has already been ordered) but I was really just curious what the op amp actually does to the sound.
Posted: Tue Oct 26, 2010 9:10 pm
by Bill Oakley
Technically you can use just about any dual op-amp. Some are noisier than others. Put a socket in the op-amps spot so you can switch them out and experiment. Plus, using the socket will ensure you don't destroy the op-amp from overheating it when soldering it in place. You should be able to pick up a socket at Radio Shack so you don't have to wait for one.
Posted: Tue Oct 26, 2010 9:41 pm
by SKC Willie
Bill Oakley wrote:Technically you can use just about any dual op-amp. Some are noisier than others. Put a socket in the op-amps spot so you can switch them out and experiment. Plus, using the socket will ensure you don't destroy the op-amp from overheating it when soldering it in place. You should be able to pick up a socket at Radio Shack so you don't have to wait for one.
I think we already have some sockets! I didn't realize the socket were interchangeable!
Posted: Tue Oct 26, 2010 9:47 pm
by Bill Oakley
Not sure we are talking about the same things. I'm talking about this:
8 pin Op-Amp Socket
You solder this in the Op-Amps spot and then just pop in the Op-Amp.
Posted: Tue Oct 26, 2010 11:49 pm
by SKC Willie
Right. That is what we have. What I meant was, I didn't realize the Op Amps just popped in out.
Posted: Wed Oct 27, 2010 12:11 am
by Bill Oakley
Oh, ok. This part "I didn't realize the socket were interchangeable!" confused me.
99.9% of dual DIP8 Op-Amps have the same pin configuration. Sometimes you get different results with different ones. Really depends on the circuit and/or if you have golden ears.
Posted: Wed Oct 27, 2010 12:18 am
by SKC Willie
When installing D1 and D2, which way should I stall the diodes. Or does it really matter as long as they are going different directions?
Posted: Wed Oct 27, 2010 12:24 am
by Bill Oakley
Doesn't matter at all just as long as they are opposite.