Page 2 of 6
Posted: Wed Sep 03, 2008 6:24 pm
by mezzio13
Fran this will be a sick project! Good (and fast) work so far!
Posted: Thu Sep 04, 2008 3:36 pm
by Fran
Day 3 - Against all odds
Another day of constant rain so i decided to press on with the project in my humble garden shed. Attrocious working conditions but i wont be defeated. In a romantic thought this is how i imagined Brian Mays father constructed his first 'Red Special' guitar...
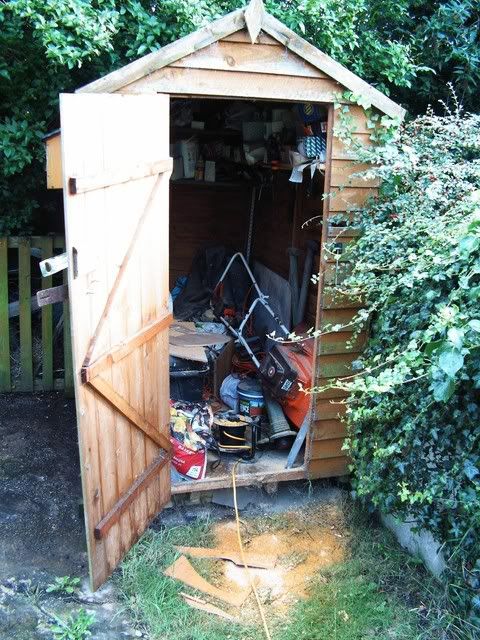
Nice, lots of room to work and no work bench..
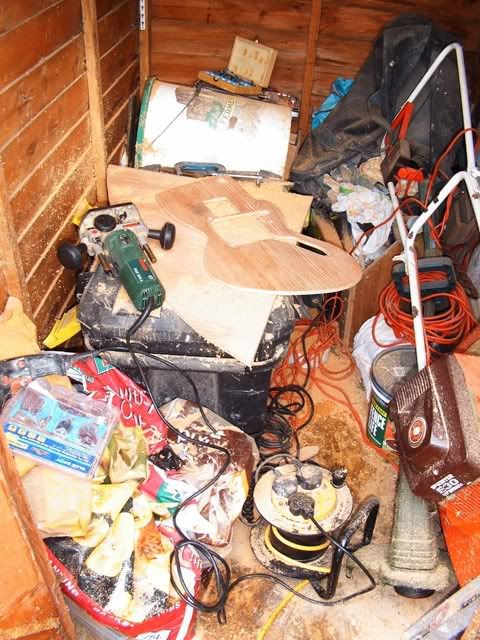
I made a template from Ply for the cavity routing of the neck pocket and electronics. This is where my first problem and minor disappointment arrived.
The Router i have wont plunge deep enough for the pup routes so it looks like going over budget and buying a Manrouter or using a good 'ole wood chisel. I have also routed for a 3-way switch near the bottom horn.
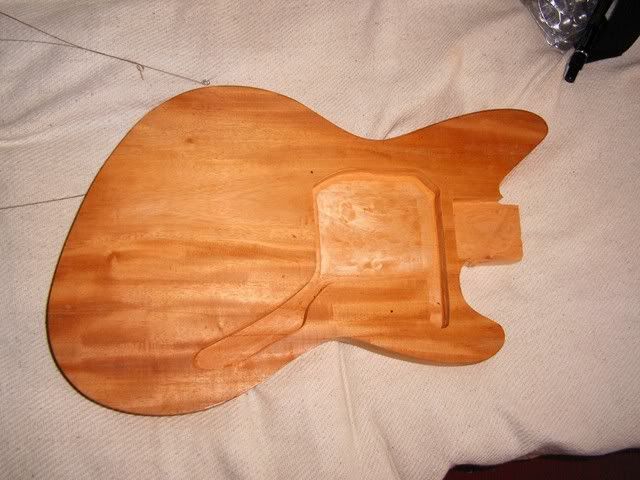
I took the measurements several times to make the jig but somehow the neck pocket is a little wider than i would have liked. Like i said it is a minor disappointment with it being a bolt-on neck guitar and other than that it fits nicely.
Tomorrow i am back at work but i am happy with the progress up to yet. Decided to wait for a fine day to profile the edge of the body. Then there is the task of fitting the bridge/trem.
Posted: Thu Sep 04, 2008 3:39 pm
by Mike
Can't you route off the extraneous wood to make it look a little prettier?
Posted: Thu Sep 04, 2008 4:04 pm
by Fran
Oh yeah, sorry i did'nt mention that. I've had enough for today thats why its still there. I'm going to double check everything lines up first as well.

Posted: Thu Sep 04, 2008 7:41 pm
by ElCapitan
That's really coming on a treat Fran. Are you going to paint it or is it going to be polished up mahogany? You should have binding round the edge for extra metalz.
Re: Jag-Stang Project
Posted: Thu Sep 04, 2008 7:54 pm
by Mike
Fran wrote:As for finish, i'd hoped to use a clear coat of Danish Oil to seal and emphasize the Mahoganys grain, then finish with BriWax and .0000 wire wool. This is a common high end Joinery/furniture method that was adopted by Patrick Eggle guitars, and i tried it on my old Jap Flying V with excellent results.
Posted: Sat Sep 06, 2008 3:36 pm
by Fran
I've spent some time looking at this project today after the Floyd arrived from Fibus (cheers dude). I've decided that idea is'nt right (phew says all).
It clashes with the body shape (more so than on that paint image). This is a little disappointing, but on another note it looks much better on the Jagmaster

Anyway, on with the day!
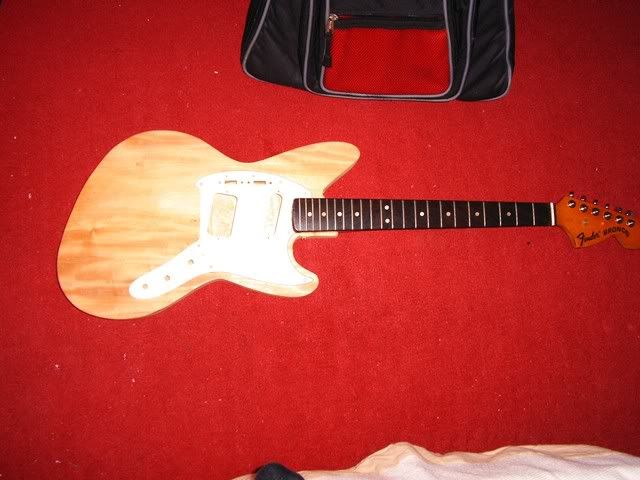
Jaguar trem it will be. It compliments the body way more than a Stang trem and i have most of the parts already. For a brief moment i considered a TOM but i dont see the point, the Jag trem can be locked and there is always the tremolo option if need be.
I also bit the bullet and purchased a larger router to make life easier, so when that and the bridge thimbles arrive i shall press on.

Posted: Sun Sep 07, 2008 3:23 pm
by iCEByTes
amazing dude ...
Posted: Sun Sep 07, 2008 5:38 pm
by Fran
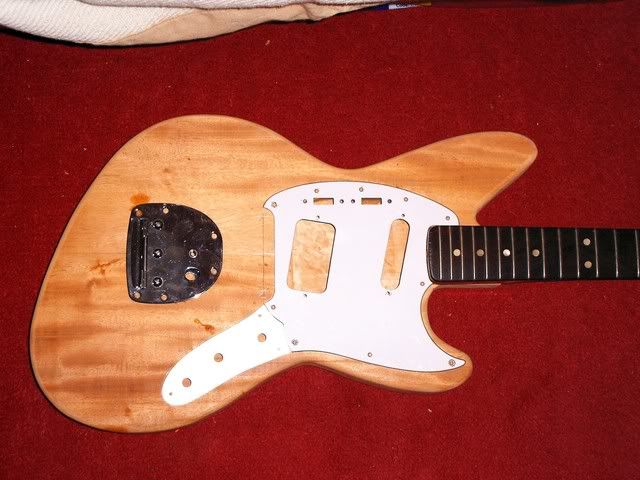
Day 4
Some further progress after the trem decision.
1/ Edges routed/rounded off
2/ Trem cavity routed (for Synchronized Tremolol)
3/ Neck pocket tidied up
4/ Marked out ready for bridge cups and neck plate holes.
Just waiting for the bridge cups to come from GPR then all the main work will be finished. It will just be a case of finishing it, then the electronics (again, some of this stuff is on order).
*Edit: may do a rib contour yet, not sure.*
Posted: Sun Sep 07, 2008 5:40 pm
by Mike
Looking fierce mate. Fantastic work on the neck pocket.
Posted: Sun Sep 07, 2008 5:41 pm
by robert(original)
i think this guitar suits you really well actually.
you only have like 8-12 guitars and non of them suit you as well as this one.
Posted: Sun Sep 07, 2008 5:46 pm
by Fran
Actually rob, i just been paying you a compliment in a pm. You kind of pushed me to do this myself and i thank you for that.
Thanks for the compliments guys. <3
Posted: Sun Sep 07, 2008 6:07 pm
by Hurb
nice work fran mate.
do contours.
Posted: Sun Sep 07, 2008 6:23 pm
by Fran
Hurb wrote:nice work fran mate.
do contours.
Thanks.
Its still got some weight to it so i guess contours would kill two birds with one spokeshave.
Posted: Sun Sep 07, 2008 6:39 pm
by robert(original)
AWSOME! MY AVOIDENCE IN MAKING GUITAR BODIES HAS PROMPET SOMEBODY WITH SKILLS TO MAKE SOMETHIN KOOL!
really tho so far it looks like its going to be a little killer.
Posted: Sun Sep 07, 2008 7:26 pm
by Fran
rob.. do you ground your bridge cups?
Posted: Sun Sep 07, 2008 7:35 pm
by robert(original)
i ground everything ng~!
i actually have a nice 16inch drill bit,
i strat at the neck pocket(the inside)
and drill straight thru to the trem cavity, then from there to the pots, and the cups.
generally if i make one i just do the trem plate, but i know have done both before.
Posted: Sun Sep 07, 2008 7:39 pm
by euan
As with anyone who does this, I'm in awe Fran. Before long you'll be getting a review in Guitarist. It'll make a beasting first paragraph.
Hooligan guitars are built by former firm man Fran in Nottingham...
Posted: Sun Sep 07, 2008 8:07 pm
by Fran
Thanks rob.
euan wrote:As with anyone who does this, I'm in awe Fran. Before long you'll be getting a review in Guitarist. It'll make a beasting first paragraph.
Hooligan guitars are built by former firm man Fran in Nottingham...

Hahah. I'm tempted to take this thing further to be honest, everyone locally is pushing me to do it as well. I feel a bit of a cop out on the neck but.. well, its my first attempt.
Posted: Sun Sep 07, 2008 8:09 pm
by euan
It'll take a few attempts no doubt. But if you are a gigging musician playing your own guitars people are going to hear and see the quality.
btw you can have the name Hooligan for free, I ain't no Malik