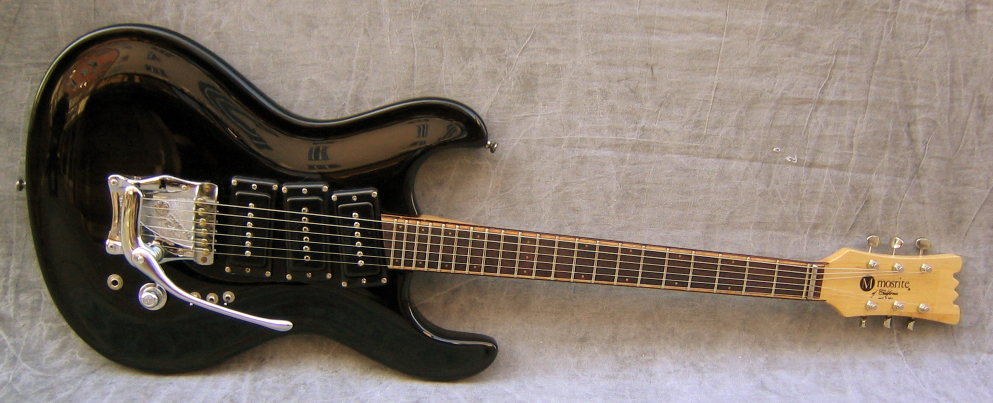
my first neck thru build

Painting? Routing? Set-up tips? Or just straight-up making a guitar from scratch? Post here, and post pics!

Moderated By: mods

User avatar
robert(original)
.
.
Posts: 7174
Joined: Thu Apr 20, 2006 12:30 pm
Location: somewhere in the midwest

my first neck thru build

Post by robert(original) »

a while back someone irl asked me if i would be willing to build them a neck thru,
when i quoted a price for a finished product they went" uuuuhhh,,, no thats cool"
but it got me thinking.
if i was to build a neck thru, what wood would i use?
what style?
what shape?
what appointments would i make to it?
i think i figured something out tho.
i started most of this before the great flooding of feburary.
but anywho.
this is a life sized template that i won't actually use like a normal template but rather like a scale modle to base and measure off of.
Image

im not sure if you can tell from the template but the neck is modled after a tele, the headstock is a design that i used on my first full custom build, and the body is a combo of about 3 bodies.
the most obviouse( i think) is the rickenbacker bass style,
next is the jag horn
and the one with the least amount of influence(but its there)
is a tele body.
the wood is pretty simple,
there is a fellow in town with a rickenbacker guitar, i have no idea what modle it is or how old it is.
but anyway its just a mohogany neck(center) and two ash wings, i thought about doing accent layers and stuff but i remembered that i hated accent layers and it just makes it look like nice plywood.
the fingerboard(not picured) is cocoabolo, a version of rosewood, its pretty cool looking stuff.
Image
the big thing on this that im really proud of is the fact that its not going to have a pg, nor a control cavity, i basically routed/chizzled out the inside on the bottom wing so that way i can throw in the electronics like in an archtop,
my goal is to make it as CLEAN looking as possible.
Image
Image
Image
here are the general specs.
25.5 scale
neck thru(DUH)
2 humbucks
1 vol, 1 tone, both push pull for the single coil sounds.
and a string thru tom with a 12 radiu for the neck
and a 3 way switch(but im not sure where to put it yet)
most of you can tell that thing is something that is rather un-apealing to me and most of you, but since it is uncomissioned im choosing most of these factors that way it will apeal to a larger audience, im rather excited about it since its my first solo neck thru build.
should be fun!
its also kinda cool cuz i don't have to rely on a center line, like at all, everything is set where it is and thats it.
im hoping to have it glued together by the end of the week and ready for shaping.
User avatar
BobArsecake
a mannequin made by madmen
Posts: 10957
Joined: Mon Apr 24, 2006 11:40 am
Location: Leeds (LeedsLeeds)

Post by BobArsecake »

Oooh, looking forward to seeing this. Thru-necks ftw.
User avatar
Hurb
Peanut the Kidnapper
Posts: 7203
Joined: Mon Apr 17, 2006 8:47 pm

Post by Hurb »

fuckin awesome dude!
User avatar
Sloan
Sexy Predator
Posts: 11797
Joined: Thu Apr 20, 2006 3:02 am
Contact:

Post by Sloan »

VERY EXCITE
User avatar
euan
partynerd!
Posts: 27589
Joined: Sat Jan 06, 2007 3:52 pm
Location: People's Republic of Irnbruikstan

Post by euan »

posting so i get updates.
Image
euan
User avatar
Haze
.
.
Posts: 4924
Joined: Tue Jan 15, 2008 4:27 am
Location: Tulsa, OK
Contact:

Post by Haze »

GO ROB GO!
User avatar
jcyphe
.
.
Posts: 16888
Joined: Thu Apr 20, 2006 3:18 am

Post by jcyphe »

It would look cool with top binding all around the body.
User avatar
robert(original)
.
.
Posts: 7174
Joined: Thu Apr 20, 2006 12:30 pm
Location: somewhere in the midwest

Post by robert(original) »

you think?
i actually decided today that im going to put flame maple binding on the neck, only the sides, and then im going to blend it into the body, it may be really tricky, but im going to try it.
what kinda binding would you like to see(shortscale audience)
i don't want to use any plastic, im burnt out on that stuff, the last 4-5 bodies i did with plastic binding were perfect(well, pretty damn close)
so i want to try wood binding, and or laminated binding.
but anywho,
look for the next post!
User avatar
robert(original)
.
.
Posts: 7174
Joined: Thu Apr 20, 2006 12:30 pm
Location: somewhere in the midwest

Post by robert(original) »

ok, so.
i went ahead and did the truss rod slot, and glued on the board.
this part will be kinda intense so if i lose anybody please speak up.
first off.
i used my table saw to make the truss rod slot instead of my lil router jig.
no real reason, i learned with a table saw, and just wanted to use it, especiall since i will be using a truss rod cover.
basically if you don't understand this part then...... i don't know what to tell you.
face down, run it thru, make a point of where the truss rod will be(of course) and follow your own marks.
Image
becuz of the head and the fact that the table saw cuts in a funny circular motion(whodathunkit?)
i had to chizzle out a bit at the end, and then up by the head of the rod.
Image
once i set it in, i used an old archtop trick and set the truss at a bow, and used bits n pieces of scrap mohogany to create "points of interest"
i saw it on a robert benedetto video.
Image
this is supposed to focus on certain points of a neck, rather then all pressure on all the board when its only at a certain point.
the common points are the relief points(2-5) and the points more associated with an acoustic or archtop with a set neck(12-15)
often times when you see a bow or an arch its at these points rather then at the 9th fret and no where else.
does that make sense?

next i set the board on the neck black, matching the center line and making sure its top tits!
Image
once i have done that i do something that is VERY FUCKING IMPORTANT!
to ensure that the board does not shift during glueing you must make sure that it is stable, some do this by staples, others with clamps. and yet some even do the opposite of what im doing and glue it on and then find the center.
i on the other hand choose to take a tried and tru method.
BY DRILL HOLES IN THE FRETBOARD!!!!!(OH NO!!!!!)
basicall one on the third fret and one on the 12th fret, offset from eachother, this method is old as shit so its nothing new.
but the advantages are obviouse,
1. the board has to extreme points that are stabalized.
2. if i ever needed to take the fingerboard off i can lift these frets and steam the glue thru these old holes
Image
this is a piece of maple that has holes in it for the general positions of the nail heads to stick thru.
one side is flat for un-raduised boards(this one)
and one side has two strips of mdf for radiused boards(no this one)
this is great for keeping even pressure and a good space for clamping
Image
next, i lay down tape over the truss rod to keep glue from running into the slot and messing up the truss rod.
then i lay down a nice even layer of glue. remove the tape, put the board down, then the nails, nail them in, then the neck clamper, brace thing.
i use 4 initial "bigfuckers"(as i call them)
these are easy to set and clamp tightly as i gather the rest and clampe them on.
Image
once those are on, i use every fucking clamp i have(that is big enough) to apply pressure.
my teacher once said something like
"if you finish clamping the fingerboard and you see that you have a few left over clamps, then you have already messed up"
and its tru, if you got em, use em, no joke.
Image
this this went from about 2 pounds- 40 pounds in 5 seconds so don't think you can easily grab one side adn walk around like an idiot with it, it its likely to crack the wood and drop the floor.
i will let this dry for a day or two(at least 20 hours)
before i rout the shape of the neck.
apply the binding.
and then finiall start shaping it(the body wings come aft the neck is decently shaped out)
User avatar
Bacchus
Whatever's handiest
Posts: 23590
Joined: Thu Apr 20, 2006 4:10 am
Location: wandering

Post by Bacchus »

Cool.
Image
User avatar
jcyphe
.
.
Posts: 16888
Joined: Thu Apr 20, 2006 3:18 am

Post by jcyphe »

robert(original) wrote:you think?
i actually decided today that im going to put flame maple binding on the neck, only the sides, and then im going to blend it into the body, it may be really tricky, but im going to try it.
what kinda binding would you like to see(shortscale audience)
i don't want to use any plastic, im burnt out on that stuff, the last 4-5 bodies i did with plastic binding were perfect(well, pretty damn close)
so i want to try wood binding, and or laminated binding.
but anywho,
look for the next post!
I think Maple binding down the neck would be cool, like on those Mosrites Semi made in the 80's. Also you could do what PRS does with the maple cap on the body, where they leave the strip unpainted and you have an instant maple "binding".

Image
User avatar
robert(original)
.
.
Posts: 7174
Joined: Thu Apr 20, 2006 12:30 pm
Location: somewhere in the midwest

Post by robert(original) »

i could do the maple binding part but here is the thing.
i found out when i did that archtop that figured wood and high end figured stuff(especially that) craps and rips when you bend it.

"the proccess of bending wood"
traditionally the sides are 2-3mms thick.
certain woods like mohogany need oil introduced into the pours so that way it keeps shape and does not snap immediately.
denser woods like certain rosewood types and maple do no need this.
basically you spray some good ole distilled water onto the wood,
get a nice modified or specially made(about 200 bucks) iron.
you just work the wood around the iron.
with the figured stuff tho, the iron and wood treatmen will take more from the "grain" or more pores area faster than the solid or "bland" part of the wood.


so back to the first part, i could do it, but i have no special bending machine, i have a soldiering iron that i can bend small stuff but im afaid that any sort of nice wood, would in fact, just fall to bits and pieces.
i have a peice that is big enough to do a mando or voilin. its perty!

i hope that my rambling answered something. The neck binding is a must tho, i started imaging it and it just seemed right,
since its a dark.light wood combo, it seemed that the cocobolo was too dark against the mohog, definitly needed da maplez@!
User avatar
jcyphe
.
.
Posts: 16888
Joined: Thu Apr 20, 2006 3:18 am

Post by jcyphe »

robert(original) wrote:denser woods like certain rosewood types and maple do no need this.
basically you spray some good ole distilled water onto the wood,
get a nice modified or specially made(about 200 bucks) iron.
My suggestion for the body was to not even bother bending anything, if you're using a maple cap. Just use a piece thick enough so that when you finish the top and sides, you can mask off a strip of the maple on the sides, you have instant "binding"

Also i'm sure you can fashion a bending iron if you put your mind to it without spending $200. i saw this guy on the internet make a neat one for nothing.

http://www.billsbest.com/thsidebender.html
User avatar
gaybear
Inventor of the Blues
Posts: 9697
Joined: Thu Apr 20, 2006 10:52 pm
Location: hard corvallis, oregon
Contact:

Post by gaybear »

A+ project
plopswagon wrote: Drunk and disorderly conduct is the cradle of democracy.
User avatar
robert(original)
.
.
Posts: 7174
Joined: Thu Apr 20, 2006 12:30 pm
Location: somewhere in the midwest

Post by robert(original) »

ok, i gotcha, i have seen a few styles where the maple cap was the binding, just not stained/painted like the burst commonly found on the top.
i don't know tho, cuz i don't really have any good planes to make a carved top.
it would be easier(believe it or not) to do it like an archtop acoustic, and not solid.
mainly becuz maple is a pain in th ass!!!
that would be kinda cool looking, i will playing with some ideas.
i have been wondering about using a really thick binding and then put a bevel on it, making it look even bigger,but i figured it would look too much like a bad teisco guitar.
User avatar
robert(original)
.
.
Posts: 7174
Joined: Thu Apr 20, 2006 12:30 pm
Location: somewhere in the midwest

Post by robert(original) »

tracy called me and told me she was working late so i figured it would be a good time to work on the neck thru some more.
basically i just did the pup route in the rear, started to hollow it out large enough for pots n such to fit thru,
and i laid down the binding.
this was pretty tricky, i new it would be,
but the first thing was to basically see where i needed the wood at to get a good string height.
Image
Image
un radiused its at 14mm's im aiming for 11 or a light 12 after i radius.
i also had to deepen the fret slots(they were only 4mms)
this is one side of the maple,.
this is actually scrap fro mthe archtop that i made during the summer.
i just used one piece and cut it down the center.
Image
now becuz of the way the bit n bearing are setup i had to accept that the maple binding won't be able to cover the entire fretboard and will infact be more of an accent layer of sorts.
but thats cool becuz i will still reap the rewards of the hole "blind fret end" thing.
Image
after i got both in i wiped away any and all glue, cleaned out the fret slots with a razor and lightly clamped the entire thing for an even pressure.
Image
hopefully i will be able to get back to it within the week, i gotta re-do robs neck and i still have to mail some stuff and make bassingtoms pup covers.
User avatar
mewithoutus
.
.
Posts: 1246
Joined: Sun Apr 22, 2007 7:46 am
Contact:

Post by mewithoutus »

wow that looks so awesome. cant wait to hear more progress!
rich people say fuck yeah hey hey
heavium wrote:grow a bat army in my room and train them to attack when someone comes in
User avatar
iCEByTes
.
.
Posts: 4210
Joined: Tue Apr 25, 2006 4:53 pm
Location: Brasil , Curitiba
Contact:

Post by iCEByTes »

holy shit dude

:shock:

too fucking good for an first try
Image
Precise dwarf bravery
Justin
NSFW
Posts: 689
Joined: Thu Apr 20, 2006 4:13 am
Location: Buffet

Post by Justin »

You've got an awful lot of clamps Robert.
User avatar
robert(original)
.
.
Posts: 7174
Joined: Thu Apr 20, 2006 12:30 pm
Location: somewhere in the midwest

Post by robert(original) »

not really, i have the bare essentials, 8-4 of each pretty much,
it would be nice to have 10 of each, and get some more bar clamps.