mustang headstock rebuild

Painting? Routing? Set-up tips? Or just straight-up making a guitar from scratch? Post here, and post pics!

Moderated By: mods

User avatar
robroe
Bon Jovi Fan Club!!1
Posts: 49936
Joined: Thu Apr 20, 2006 1:00 pm

mustang headstock rebuild

Post by robroe »

Ian From speakerFIRE came over this week and dropped off his ducktape stang. the headstock got way damaged after being smashed by one of the pet elephants they take on stage with them for shows.


when i first got it it didn't look that bad. there was a crack in the top that went all the way along the tuners but didn't end all the way thru. on the back, it was busted all the way thru. so the whole thing was just kinda on life support thanks to the string tension on it.

after i took the strings off the top three tuners fell right out, the screws for them are fucked, one is missing. I unscrewed the other 3 and found out that the headstock isn't completely busted in half. but to fix it im going to have to bust it all the way in half to get the liquid nails in there good enough for it to hold. its going to have a nice little battle scar when im done. all the work i do on the back of the headstock should be covered up by the tuning machines.

lots and lots of photos / video to come....


Image

Image
Image
dots wrote:incesticide
User avatar
RumorsOFsurF
.
.
Posts: 327
Joined: Mon Jun 04, 2007 1:55 am
Location: Independence, Oregon

Post by RumorsOFsurF »

Is liquid nails really that effective? :shock:

Are you going to just butt the pieces together, or perhaps dowel them?

I can't wait for updates!
Image
User avatar
robert(original)
.
.
Posts: 7174
Joined: Thu Apr 20, 2006 12:30 pm
Location: somewhere in the midwest

Post by robert(original) »

i don't think there is much to dowell, liquid nails would be the shit on this thing, as long as its a clean break it will be fine, rob knows what the fuck he is doing.
User avatar
RumorsOFsurF
.
.
Posts: 327
Joined: Mon Jun 04, 2007 1:55 am
Location: Independence, Oregon

Post by RumorsOFsurF »

I don't question Rob's knowledge or ability, I know he's more than capable. I just don't know shit about wood repair. :lol:
Image
More Cowbell
.
.
Posts: 6206
Joined: Thu Apr 20, 2006 3:31 am
Location: Jefferson, GA

Post by More Cowbell »

Good luck with this project Rob, and take loads of pics.
User avatar
robroe
Bon Jovi Fan Club!!1
Posts: 49936
Joined: Thu Apr 20, 2006 1:00 pm

Post by robroe »

there are many differernt kinds of liquid nails. i am using the brown kind. not the clear kind. the clear kind I use on my skate shoes to put them back together after they get torn apart.
dots wrote:incesticide
User avatar
robroe
Bon Jovi Fan Club!!1
Posts: 49936
Joined: Thu Apr 20, 2006 1:00 pm

Post by robroe »

ok when i started it looked like this

Image
split at the top all the way thru, the split goes all the way thru on the back side but on the face of the head stock it only goes down to the low E.

Image


after i got the stings off the first 3 tuners fell out. screws and all.
Image
Image


took out the bushings to have a better look...applied some hand pressure to get a good idea of what the finshed product will look like before starting.
Image


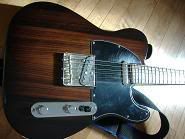
backside of it minus bushings and tuners
Image
Image


so my main problem with this thing was that it was split allllllllllllllllllllllllllll the way down to the end on the back but not on the front...there was no way to get glue in there where it was needed, and if i didn't get it in there it was just going to be super wimpy. so i had to pull it off. i hated doing it but it had to be done. it made me sad. I imagine doctors get the same feeling re-breaking someones leg when it didn't heal right on its own.

Image


doing this made it much easier to apply the glue and get it reset
Image

jam the bushings in there before you lock it down or else who knows what fuck all will happen to the holes. its just a better idea to make it dry around the bushings than dry without them. provides more support in there under the clamps.
Image


after you get it laying exactly the way you want it to dry, get out your tools for traction. Im using a 2 1/2" gripper for the top and a 3" heavy duty C clamp for the bottom. the gripper goes right on with out hassle. the C clamp you have to fashion a flat surface for the thing to put pressure on. thats why there is a yard stick jammed in there....if you just put a clamp on that joint, it will just roll right out as you tighten it due to the curve.
Image
Image

the yard stick is made of some very soft light wood...so as i tighten the clamp down it gets dammaged, not the guitar. I also stuck a round felt disk from my dremmul set under the top side of the clamp so it won't fuck the wood all up on the top side of the headstock...although at this point i don't think one more little mark is even going to be noticable.

it has sat here on my bench like this for a day now. I will let it sit until tonight before i clean the excess glue off and give it a go with filling in the screw holes and redrilling them. its going to be tricky because all the screw holes are right IN the break. vibration might fuck the whole thing up and I will have to start over. hope that doesn't hapen.
dots wrote:incesticide
More Cowbell
.
.
Posts: 6206
Joined: Thu Apr 20, 2006 3:31 am
Location: Jefferson, GA

Post by More Cowbell »

Looks like he'll be very impressed. Good JOB!!!!!!
User avatar
robroe
Bon Jovi Fan Club!!1
Posts: 49936
Joined: Thu Apr 20, 2006 1:00 pm

Post by robroe »

on that last photo, the giant black crack looking thing is just dirty glue. once i clean it up it will look like the photo above with very little indication that a crack is there.

lucky for Ian, the headstock already has quite a few vertical lines in the wood going for it. the crack should blend right in and be un-noticeable on stage, on the front of the headstock
dots wrote:incesticide
More Cowbell
.
.
Posts: 6206
Joined: Thu Apr 20, 2006 3:31 am
Location: Jefferson, GA

Post by More Cowbell »

Are we ludwig rocker brothers? Are your drums Ludwig rockers?
User avatar
robroe
Bon Jovi Fan Club!!1
Posts: 49936
Joined: Thu Apr 20, 2006 1:00 pm

Post by robroe »

my shells are garage sale 100 dollar drums. my dad and I re-wrapped them all in white wrap when i was in like 5th grade. all indications of what they were are gone. so i have no idea.

my hardware is this though:

early 70's ludwig ride stand
early 70's ludwig hi hat stand
early 70's ludwig snare stand
CB700 crash stand
Pearl bass drum peddal

all the ludwig shit is from my dads old ludwig double bass set he had(still has) in the 70's. it was wrapped in blue oyster pearl. color is impossible to find now adays. everyone has black oyster pearl but not blue. old ludwig shit is sturdy as fuck. quality back in the day. it will last me forever
dots wrote:incesticide
User avatar
ludger
.
.
Posts: 316
Joined: Mon Aug 28, 2006 11:19 pm
Location: ontario

Post by ludger »

Hey rob,

Lookin' good so far.

Could you explain/take pics of the tuner-screw-holes-redrilling-process? I have to do this soon and another experienced take would be helpful. Thanks.
Image
User avatar
robroe
Bon Jovi Fan Club!!1
Posts: 49936
Joined: Thu Apr 20, 2006 1:00 pm

Post by robroe »

yea i will. i am documenting this whole thing in the effort to get more outside work in. gotta start somewhere. I told ian i would do it for free, but i am going to photograph everything and possibly take them to local shops
dots wrote:incesticide
JamesSmann
.
.
Posts: 11873
Joined: Thu Apr 20, 2006 10:15 pm

Post by JamesSmann »

very impressive so far dude! you're like a headstock surgeon.
User avatar
robert(original)
.
.
Posts: 7174
Joined: Thu Apr 20, 2006 12:30 pm
Location: somewhere in the midwest

Post by robert(original) »

FUCK YEAH!@ rob bringin the skills!!!
if you ever encouter this again and want to try something else, roping works well too~!
good idea with the ruler tho! i would have wasted 30 mins trying to shape a piece of mdf to that shape.
User avatar
Mike
I like EL34s
Posts: 39170
Joined: Thu Apr 20, 2006 8:30 am
Location: Edinburgh, Scotland
Contact:

Post by Mike »

Brilliant.

Looks like you're doing an ace job. That thing is gonna be good as new.
User avatar
robroe
Bon Jovi Fan Club!!1
Posts: 49936
Joined: Thu Apr 20, 2006 1:00 pm

Post by robroe »

ok i got it out of traction. I still need to hit it with some honda polish and get off the resedue but heres what im working with to this point.

Image

Image

Image

Image

I think im going to wait until tomorrow to start working on the back of it.

Image
dots wrote:incesticide
User avatar
James
Nutmeg
Posts: 10645
Joined: Thu Jul 13, 2006 6:15 pm
Location: Boxingham Palace

Post by James »

At the very least this guy needs to buy you a crate of beer.

Good jorb.
Shabba.
User avatar
RumorsOFsurF
.
.
Posts: 327
Joined: Mon Jun 04, 2007 1:55 am
Location: Independence, Oregon

Post by RumorsOFsurF »

Looks great, Rob. You certainly do know your way around a guitar workshop.
Image
User avatar
DGNR8
.
.
Posts: 4220
Joined: Sat Sep 30, 2006 2:51 am
Location: DC Area

Post by DGNR8 »

On the front, which is arguably the most important visible angle, it looks almost like grain. The best part is that maple is mofo hard and the glues area may be even stronger than the rest. Unlike a Gibbo, where you might still have worries, I think this thing is good to go, even in a stress point around the tuners. Nice job, brah.
Yell Like Hell