Black Cat Bone wrote:Uumm Mastering. Any good free sofware for this? Will it do much for the final product in Wav format?
.Wav is done ues PCM (have a quick browse at the wiki page
here, the diagram shows it quite well). You'll have heard of the phrase compression with regard to things like MP3. That's lossy compression, which means that it loses data from the PCM type signal in order to reduce the amount of data. There is lossless compression which reduces the amount of data but keeps all of the digital detail of the PCM signal (one example is
flac.
When you record digtal audio you'll be recording a PCM signal. In the majority of cases that will be in wave format. I know you said you wanted 'do this' rather than the theory but that's quite core to digital recording so it's worth having a reasonable idea of what's going on there.
In terms of what all that means for you your main issue will be resolution. On that graph on the wiki page the y axis represents the bit rate and the x axis the sample rate. You'll have heard of 8-bit in terms of computer game music 8-bit music. 8-bit can hold 256 different values of information, whereas 16 bit can hold 65536. CD resolution is 16-bit and 44.1khz sample rate. So if you're going to aiming for CD you may as well start at 44.1khz. Some software will default to 48khz and this is the standard for some things (I think maybe ADAT) but I'd say just go for what you're aiming for. There's an argument for recording in 24 bit but frankly it isn't going to matter. Stick to 44.1khz and 16 bit .wav files for your projects.
I've rambled a bit there and it may well be stuff you know but it's definitely worth having a vague idea of because coming across that sort of thing and not understanding what it means can mess up your work. To go back to your original question you definitely want to be mastering. I'm not great at it but I might have a bash at making a post in that other thread.
Black Cat Bone wrote:Further to the above I've read some comments from James and others about how the instruments are tweaked in EQ to occupy a particular frequency range. Again Is there a good beginners guide to both the prinicpal AND how to do it?
Considering you're using cut up drum samples, I'm going to go ahead and assume you aren't really going for a natural reverb thing. You're probably going to be recording fairly dry and adding a little reverb later if you want it. Also as you're overdubbing rather than recording several things together you aren't going to be needing to consider the bleed on mics. For example if you had a guitar amp in a room with drums you need to be mindful of how the drums sound on the guitar mic even if they're quiet. This paragraph is a bit of a disclaimer that what I'm about to say doesn't always apply but it will probably apply to you quite well.
My advice is to EQ the hell out of everything but try to make it sound like you haven't.
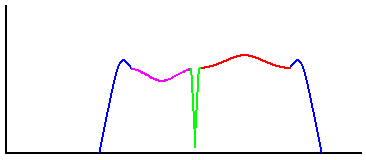
This graph shows what I would usually do to a vocal. It's colour coded to show the different EQ functions. You'd set each individually. Hopefully your software Eq looks similar.
The two blue bits are high and low pass fliters (you might see that as an acronym, HPF, or as low cut. Low cut and HPF are the same thing). You want to set this to be quite steep. Probably not as steep as it allows, but fairly steep. That little hump on each is an artifact cased by it being too steep. You're going to have a little of that but you won't notice it. I think 24db an octave is how steep I normally go for but that's off the top of my head and I'm not sure it's even written in that format. Anyway the idea with these is to remove irrelevant information. Your vocal recording probably includes a little bit of hiss. If all of your tracks do, then that hiss adds up and you really don't want to be turning down the treble when you master to get rid of it because you'll still have hiss but you'll also have a bad mix. So set up a fliter like that and bring it slowly down. Start at 20kHz and come down probably to around 15kHz. Somewhere near here you'll start to hear it piss on the cornflakes of your vocal, which is the signal you've gone too far. Keep going and see what it does. Move it down slowly as you listen very carefully. This is a set it and forget it type step so take some time over it because it can help you a lot later. So find the point where you think it begins to take away info you want and then move it back up a little to be safe.
Now you need to do the same for the low cut, but it's a little more difficult. Here you're looking to remove things like a distant car driving by, or structural vibrations from someone closing a door downstairs, mic stand vibrations are also common. On something like a vocal you'll be able to get it reasonably high. Not as high as in that quick mock-up drawing, but you'll get rid of a good chunk of bad stuff. Again it probably won't seem that bad with the track isolated but these things can add up and it really can make mixing a lot easier. I forgot to mention on the other bit but do this sort of thing with the track solo'd. Maybe drop it back in to test it a little but mostly do it solo'd. With the low end it's more difficult to hear the point at which it starts sounding shit, so be a little more prudent with keeping it on the safe side.
The green bit is a drastic cut. You can use that sort of thing to get rid of some nasty sounding stuff. You might not want it often but it can be good. The most common way to use it is to boost first. Move it around to isolate the bit you want to remove, then cut.
The pink and red bits are more difficult but they're where you're going to be placing things. You might find the pink bit sounds good, but there's a lot going on there in the drums and it just makes the vocals a little unclear. The red bit might not be quite so nice, but there's a little bit of a gap there and if you boost that slightly (probably +/-2db here but it really depends on the EQ you use so it's hard to give numbers) you can create a little space in the frequency spectrum for your vocals. Sitting vocals in the mix is notoriously difficult but this sort of thing can help. It means you can have the vocals at a reasonable level but also be clear. A lot of bad mixes have loud vocals because it's the only way to make them heard over the stuff it's competing with. And as an important add on to that, you might boost the guitars in the pink area, and slightly cut them or something else in the red. It's difficult to generalise without examples but that's the sort of thing I look to do in order to create space.
Keep in mind that you're going to want to occupy the low and high end still. If you're using reverb on a guitar I'd be hesitant to cut too much of the high end, and you're going to be taking very little out of a kick drum or bass in the low end (I'd still use a filter there, but perhaps only up to 50Hz or so).
This is already very long so I'll let you digest. I can talk about space in the stereo field and compression quite a bit in a similar way, but I'll leave it for a minute. When taking on a mix that sort of EQ is the first thing I'll hit. It's not an ideal way of doing things, but it's functional. Ideally you'd give more consideration to the recording environment and that sort of thing. I think given what you describe this sort of approach will be effective.