Page 1 of 2
Dual HB Orange Jag w/ '65 Neck - Project Started
Posted: Fri May 07, 2010 7:44 pm
by Dice
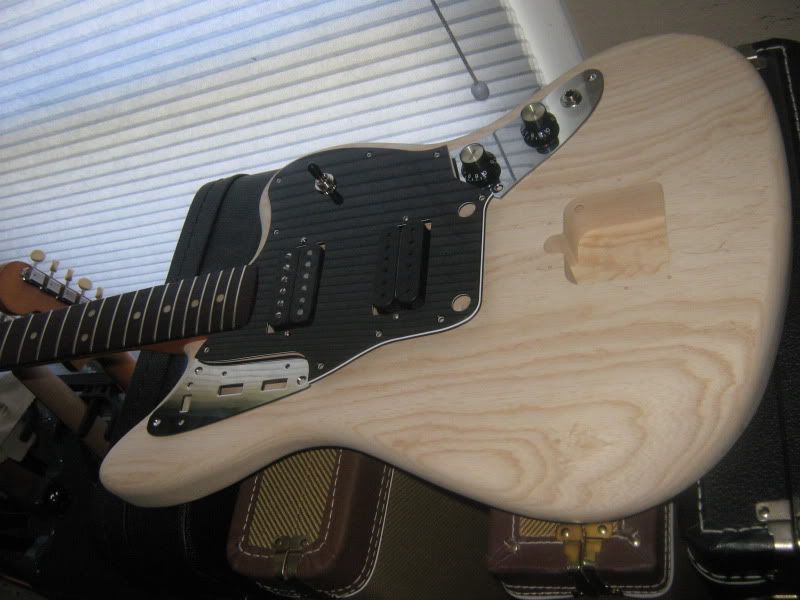
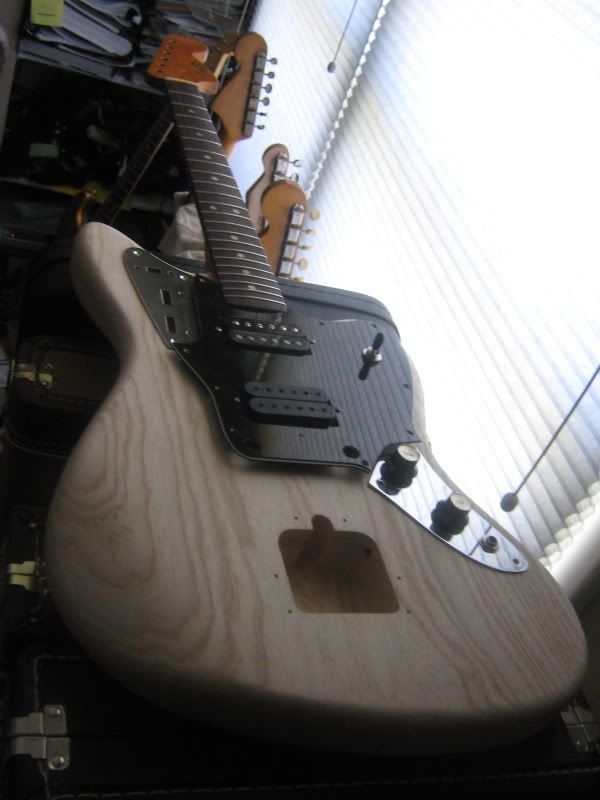
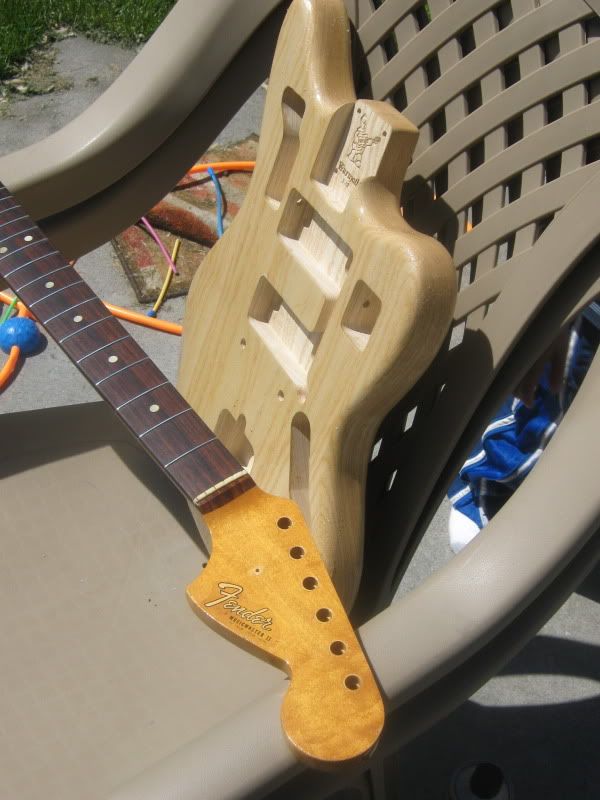
I decided that it was time to use up the spare parts I had lying around. I had a not yet dedicated '65 MusicMaster neck lying around, a couple of black humbuckers (DiMarzio Evolution bridge, and a Gibson 496r in the neck), pots, cap, jack, 3 way switch, reflectors... So, I ordered a Warmoth body, HH guard, and some hardware to get this project underway. (still waiting on a Mustang bridge, trem, and tuners to arrive).
The setup will be a master volume and master tone w/ Les Paul style switching at the lower cutaway, with the upper control cavity being unloaded. (If anyone has ideas for what to put up there - lemme know!)
The color will be ReRanch Orange - which is going to be a translucent orange Nitro.
Today, I applied a couple of coats of Minwax Wood Hardener to the body. I'm using this rather than sanding sealer. There will be no primer coat. I will sand the body tomorrow, do another coat of wood hardener, and possibly repeat the next day (Ash is so porous!). Color will start next week (whenever it arrives from ReRanch).
Both of my other Jags are wired vintage and/or vintage correct. This one will depart from "the norm" significantly - and be one hard rocking S.O.B.
Be prepared for total amateurness, as usual. I'll do my best to take photos from angles which conceal my total hack job!

I'm pretty excited.
Stay tuned!
Posted: Fri May 07, 2010 8:25 pm
by hotrodperlmutter
gonna be spankin' hot.
that neck looks fresssssh.
Posted: Fri May 07, 2010 8:41 pm
by Dice
hotrodperlmutter wrote:gonna be spankin' hot.
that neck looks fresssssh.
Thanks!
That neck is super clean. Whoever had it before me leveled and polished the frets (and clearly never played on them after that - they seem to be pretty much full height, too - it probably didn't even need a level done) - and the thing is in just stupid good shape. No dents or dings, no real board wear, although there is a good bit of wear through on the back of the neck. Must have been a very light player... much unlike me!
I'm pretty pumped. The idea just sort of popped in my head one night. All black gear, HBs, orange body, simple controls...
I hope it turns out alright. I am a total amateur when it comes to paint - and I don't plan on doing a "relic job" on this one - so I won't be able to cover up my mistakes quite so easily!
Posted: Fri May 07, 2010 9:01 pm
by hotrodperlmutter
if you can master those relics and keep them tasteful, i have nothing but faith in your 'like new' paint jobs.

i was going to paint my chromeless jag project orange (which has similar luscious grain), but have opted to do an shell pank, so i think the aenmaster will be orange soon.
keep up the killer work!
Posted: Sat May 08, 2010 2:42 am
by Dice
Thanks! I can always use a bit of a confidence boost, since I have absolutely no idea what the hell I'm doing!
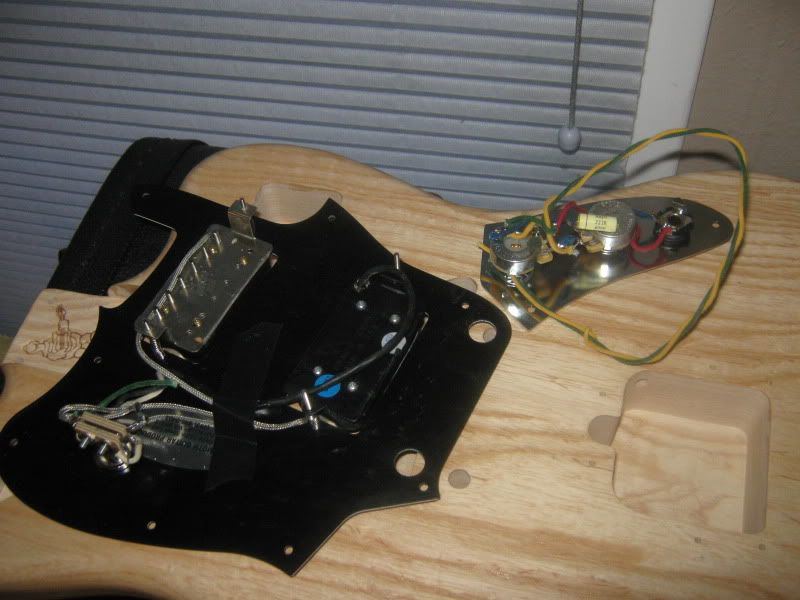
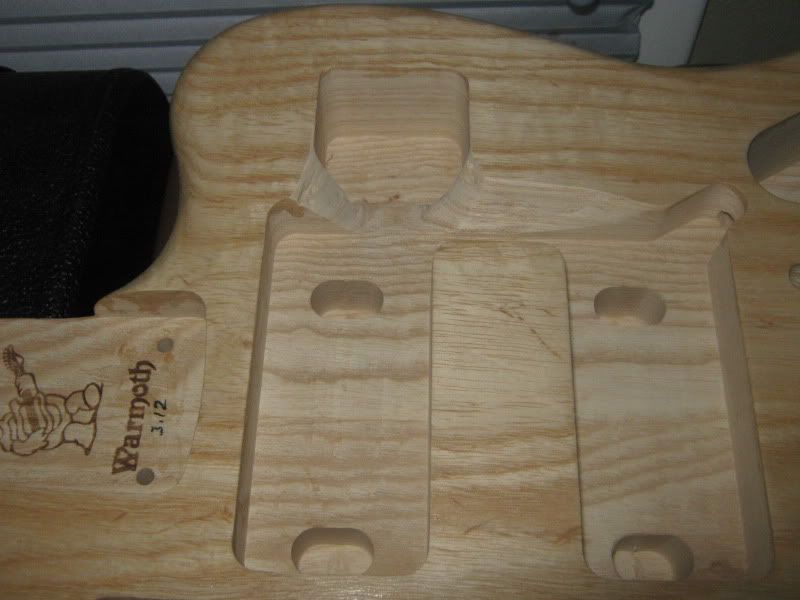
I got the wiring done today, body is prepped (two coats and sandings on the wood hardener seems like it will be enough).
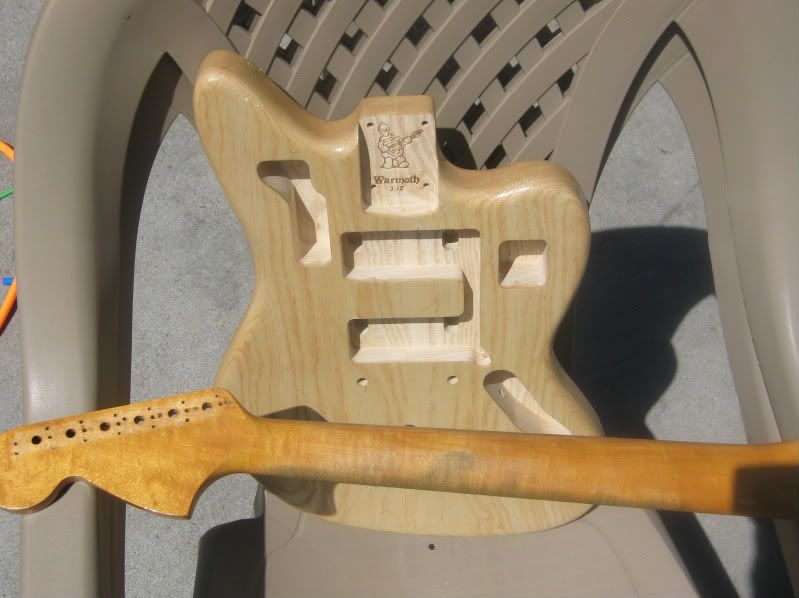
I realized that without the lower controls (using the 3 way instead), running wires between the lower control cavity and the humbucker cavity was going to be a PITA. So, I used a makeshift chisel (screwdriver) and hammer and cleared that wall out. Then some light sanding, and pocket knife whittling...
And, this is where we are. Wiring is done. Body prep is done. Waiting on paint and a few pieces of hardware.
Posted: Mon May 10, 2010 3:26 am
by DGNR8
I have a jag project with almost the same routing as that one. Now I know why. I am making it a standard Jag, but painted it a very non-traditional Fender color (copper).
You may have been able to drill that access point, but if you are curious, you would be AMAZED what a single sharp chisel can do. And they are pretty cheap. You can shape that area to look like factory. The trick is to shave the spot a bit at a time, vs. chipping hunks, which can cause nasty splits.
Posted: Mon May 10, 2010 6:14 am
by Dice
Thanks - I'll probably go ahead and pick up a chisel tomorrow while I'm out.
I was trying to use the Dremel on it... but didn't have much luck. Then, out came the screwdriver!
Minor update, I thought that the belly cut was too shallow, so i sanded it a bit deeper:
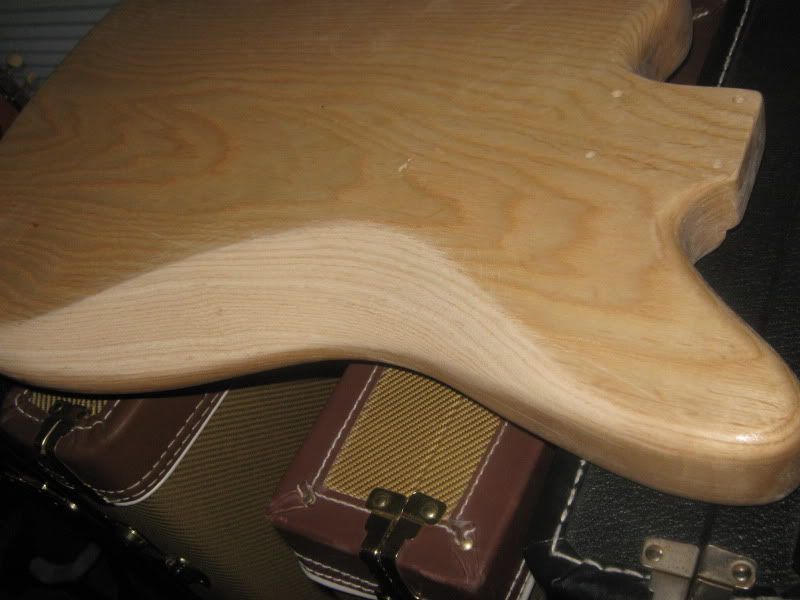
The cut here is still much shallower than on my '65 and '63, but it is a bit closer. The original cutaway was just barely there at all...
Posted: Tue May 11, 2010 2:54 am
by Dice
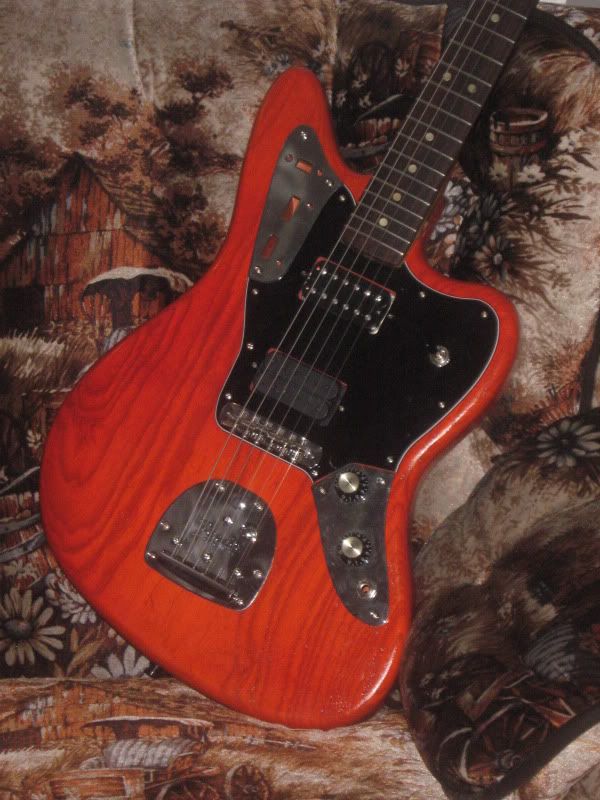
Professionals, purists, and those with common sense - look away! I finished AND ASSEMBLED this guitar in ONE DAY!
I just did one coat of orange. That is all. I went to do one last little touch on a spot that looked thin... and... RUN!

So, I wiped it, sprayed again, and said "screw it," I'll live with it. It is right in the forearm area, so it'll eventually wear smooth and through, I'm sure. Basically, what I've got is a Gibson style "satin finish." One coat, no buffing, and I quite frankly love it!
I let it hang up outside in the wind for a while to dry faster, and slapped this beast together. I'm really liking it so far. It is the lightest of my 3 Jags. I've spent a bit of time doing a setup - filed my nut slots down - it still needs a bit of tweaking...
Anyway, here are the pix. New bridge pup going in next week.
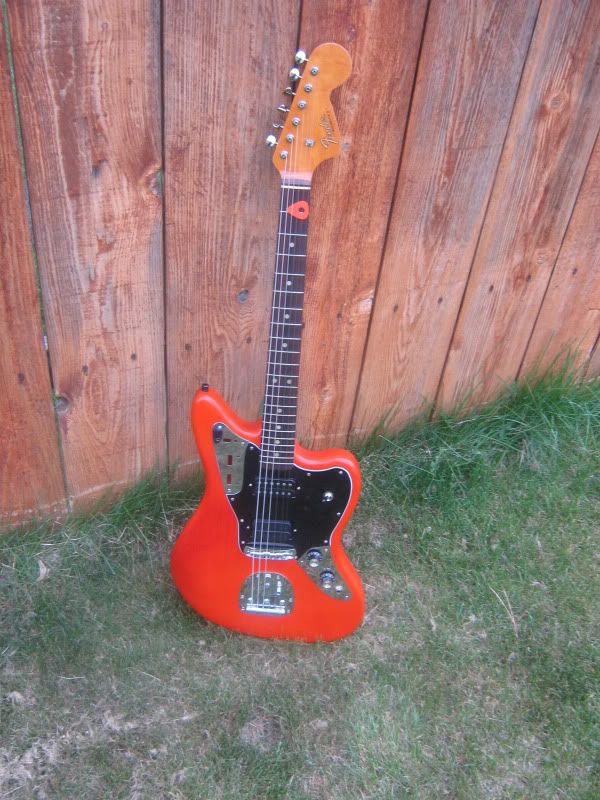
And, on the ugly couch...
Posted: Tue May 11, 2010 4:55 am
by dub
I imagined this way more orange.
But I like it!
Posted: Tue May 11, 2010 5:34 am
by Dice
Thanks! It IS pretty orange - all of these shots were taken in pretty low light. A darker orange for sure, though.
Posted: Tue May 11, 2010 6:29 am
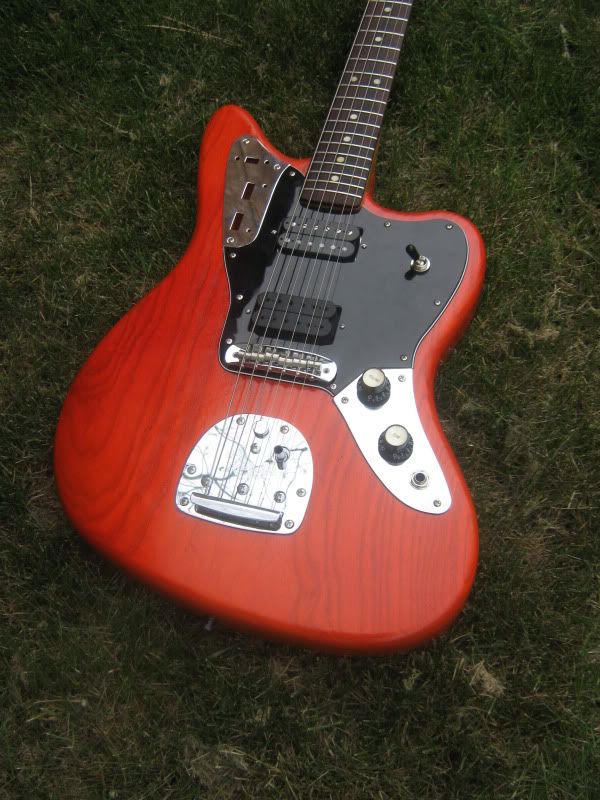
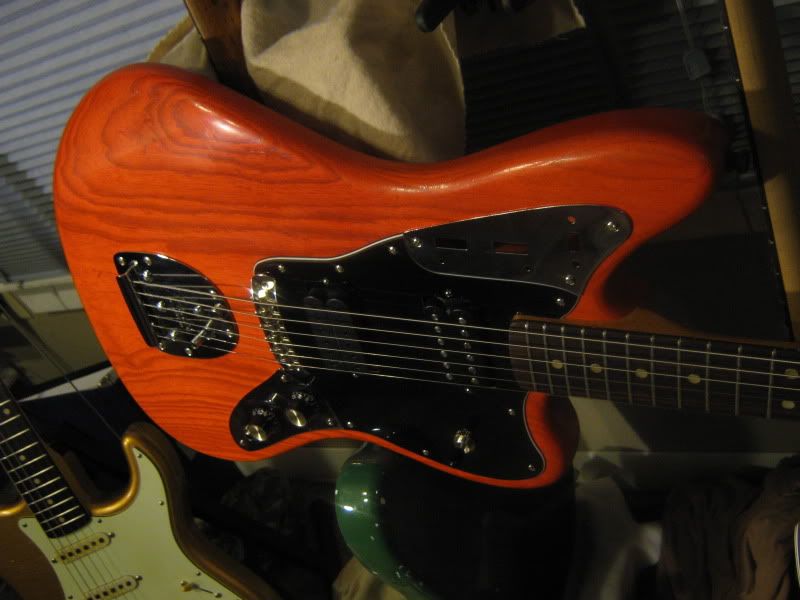
by Dice
I had a bit more success here... it seems I can just do no wrong, despite going about every step in the process like a total bonehead. I had some areas which were a bit glossier and some which were a bit more matte... this was due to the inconsistency in my prep work (which was sloppy, as usual). Well, I pulled out my rubbing compound and an old T-shirt, and after about ten minutes of work, the finish is even and very "satin."
The mission was a success.
Setup is done. Just waiting on a different bridge pickup to try in here from the guys at Madhouse Designs.
Posted: Tue May 11, 2010 12:28 pm
by JJLipton
Dice wrote:
Setup is done. Just waiting on a different bridge pickup to try in here from the guys at Madhouse Designs.
Noooooo! Stick with the evolution and rock out! I wanna hear a steve vai cover on that thing!
Posted: Tue May 11, 2010 1:05 pm
by endsjustifymeans
I want to make babies with that jag, and I don't really like jags...
Posted: Tue May 11, 2010 1:16 pm
by Dice
The odds of me pulling off a Vai cover are slim to none!

I'm Blues or Punk Rock, with not much else in between. My playing skills are about as good as my finishing skills!
Ends - thanks much. It came out better than I'd expected it would.
Posted: Tue May 11, 2010 1:18 pm
by dug
Looks great!
Posted: Tue May 11, 2010 2:40 pm
by Dice
Gracias. I still need to get the upper control plate figured out... If anyone knows where to find a "blank" one, that'd be great. I may just add another circuit up there eventually...
Posted: Thu May 13, 2010 12:22 am
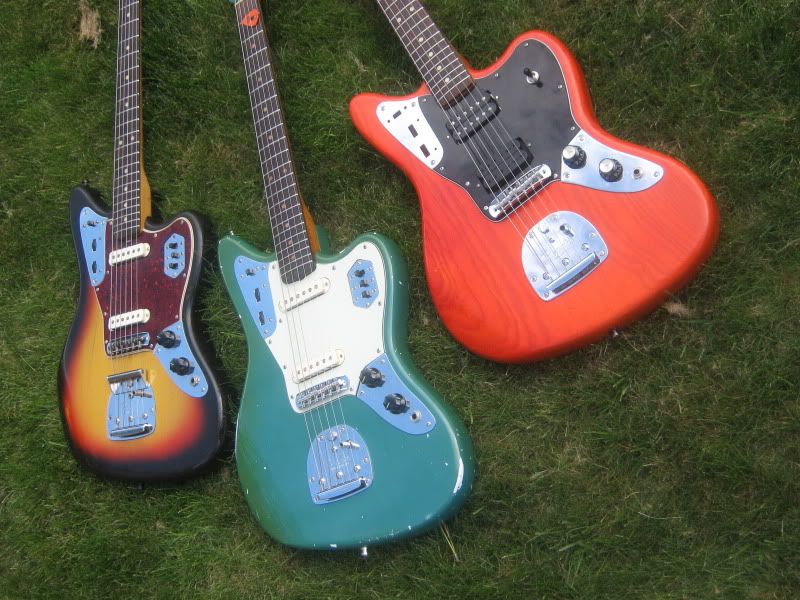
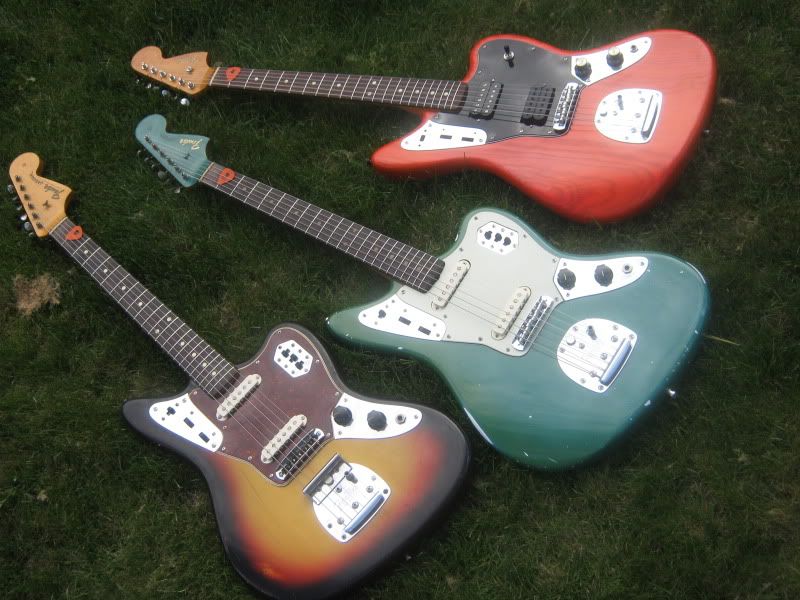
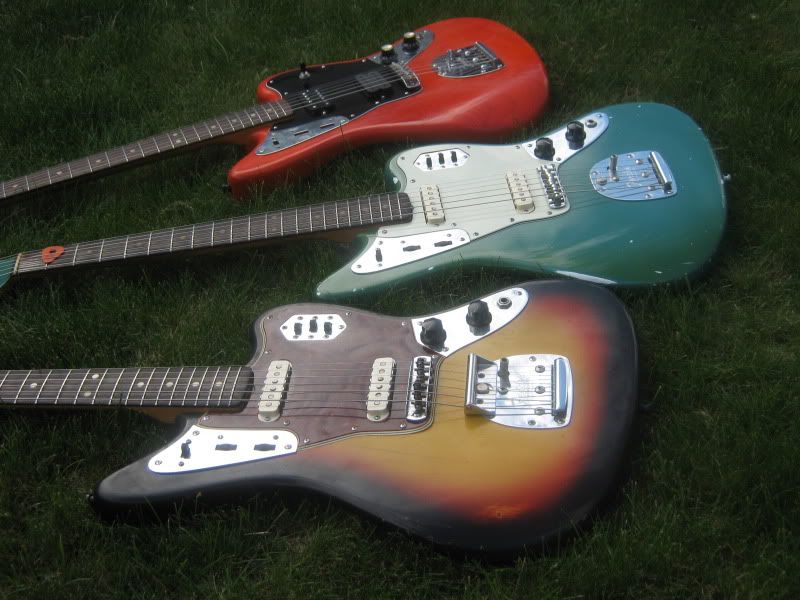
by Dice
Posted: Thu May 13, 2010 2:15 am
by hotrodperlmutter
gross. so disgusting. DNW.
ha, only kidding. great collection, per usual, diceman.
Posted: Thu May 13, 2010 3:17 am
by Dice
Thanks boss!
Posted: Thu May 13, 2010 3:25 am
by Haze
That grain looks awesome that orange! Very cool, all in a days work. You'll have to come to a shortscale meetup and let me have a go on some of your great vintage shortscale. They've all looked superb and it's great to see someone on the forums who does all of these little projects and restorations all the time. Looking forward to the next!