30" scale Telecaster/ Esquire bass build (pics)

Painting? Routing? Set-up tips? Or just straight-up making a guitar from scratch? Post here, and post pics!

Moderated By: mods

Rotor
.
.
Posts: 13
Joined: Mon Oct 25, 2010 1:46 am
Location: IL

30" scale Telecaster/ Esquire bass build (pics)

Post by Rotor »

Winter project time is winding down and I have to get moving on this thing. It’s going to be a short scale (30") Telecaster/ Esquire bass. I was inspired by some pics I saw of a bass Rhomco built that was laid out similar to this so I thought I would give it a go.

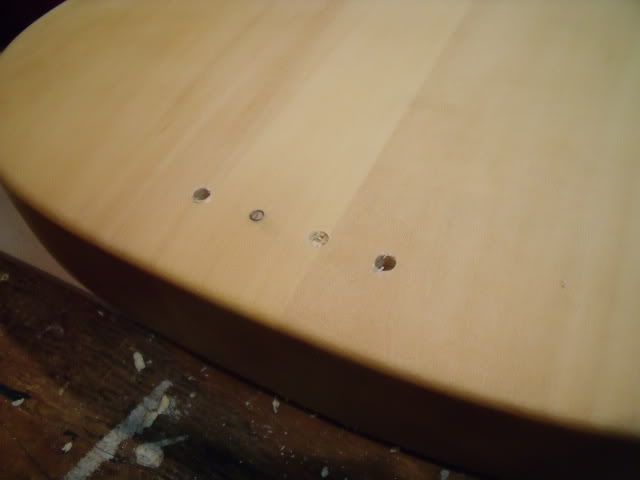
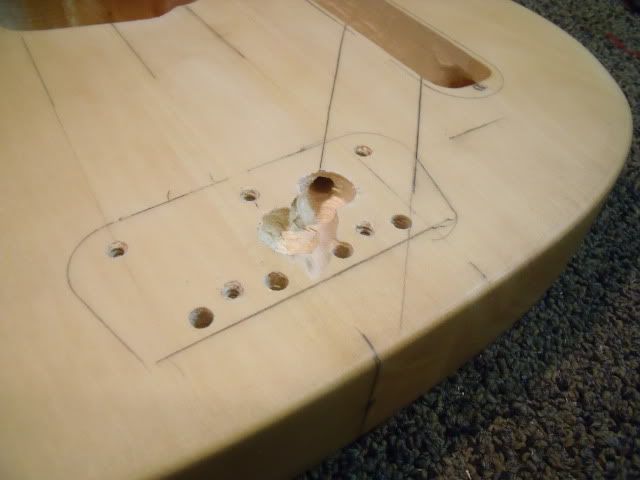
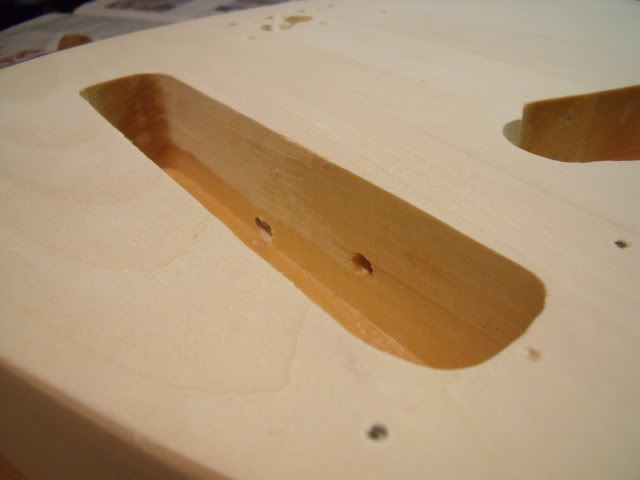
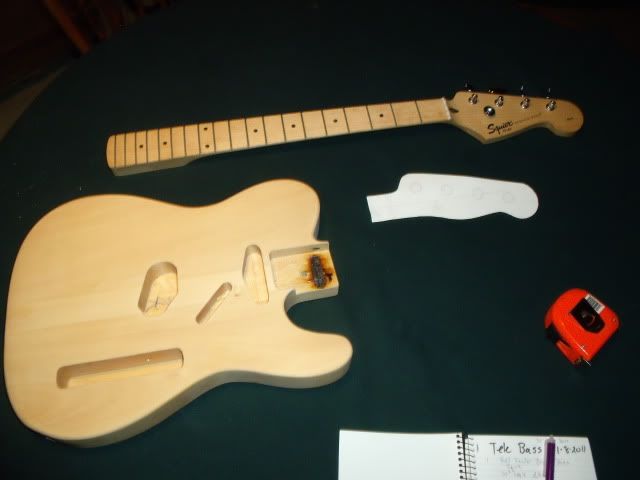
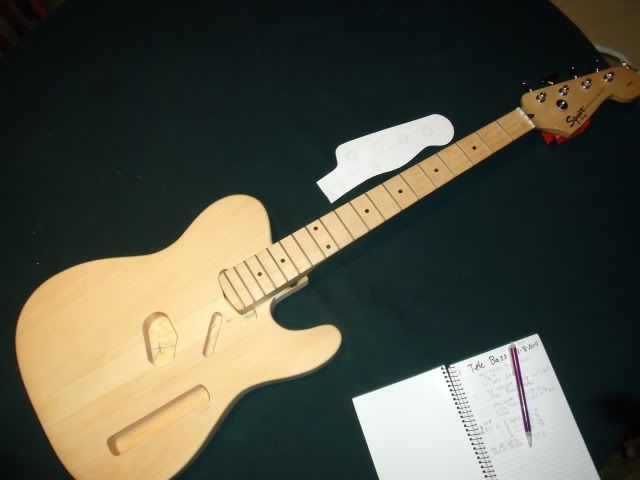
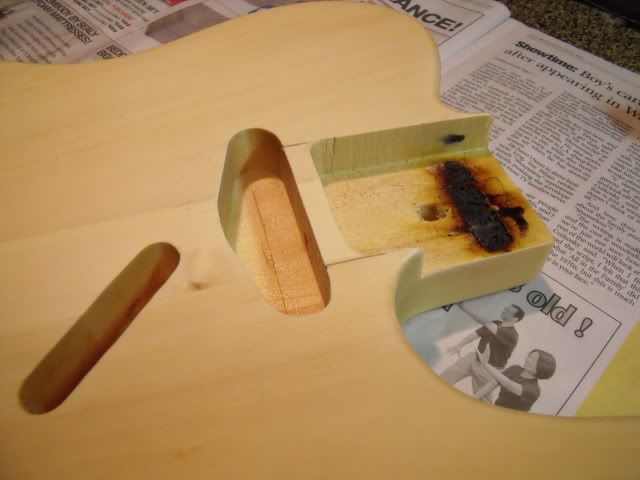
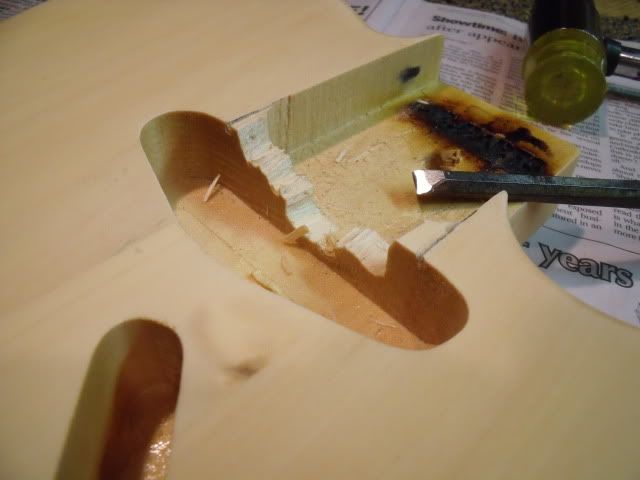
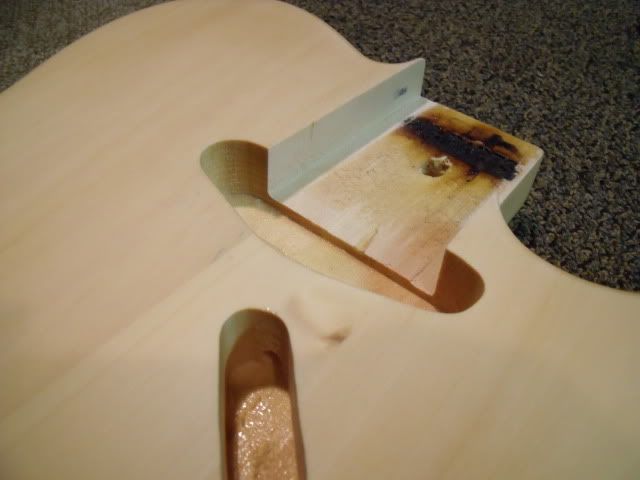
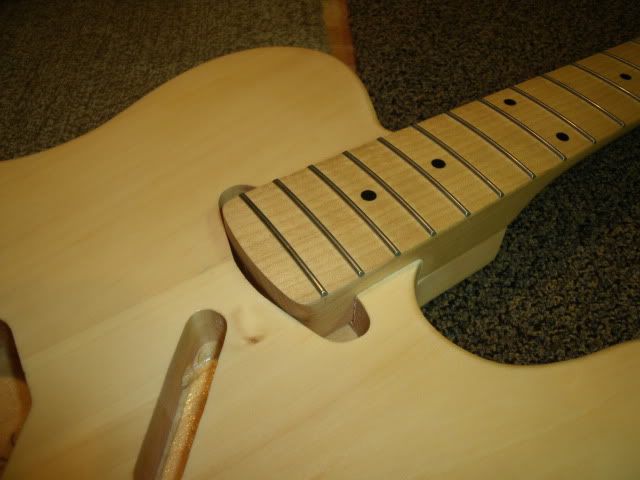
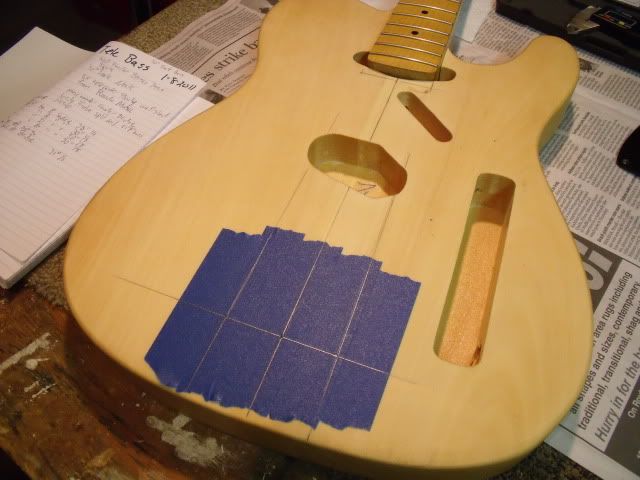
It will use an off the shelf 3 piece Alder Tele body from Rondo that was routed for standard Telecaster bridge and neck pickups but not drilled for the guitar string through bridge locating holes. To keep the overall length close to that of a guitar I am going to seat the neck deeper into the body by knocking through to the space routed for the Tele neck pickup.

Image

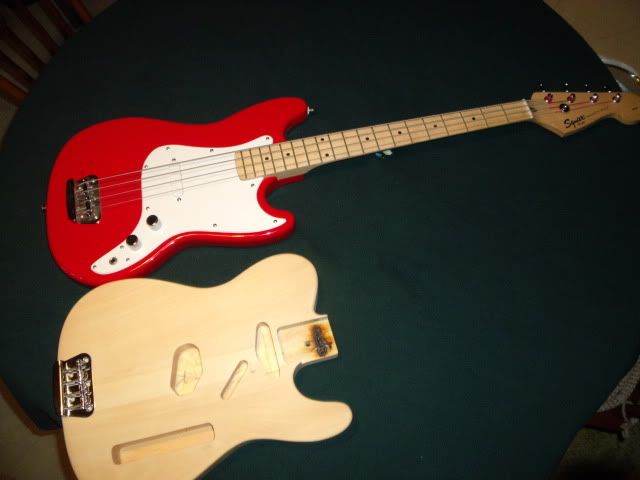
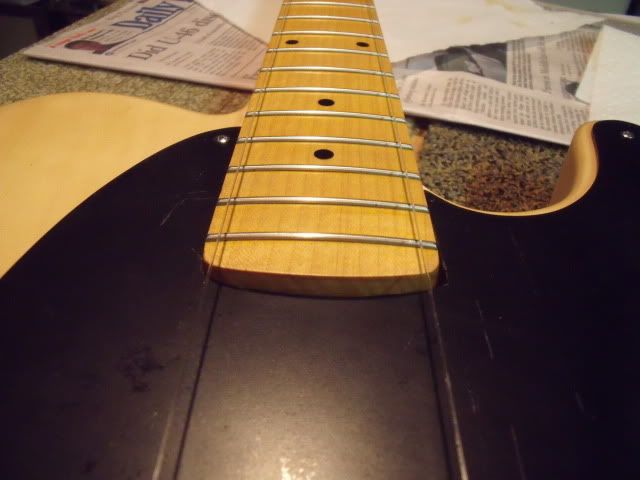
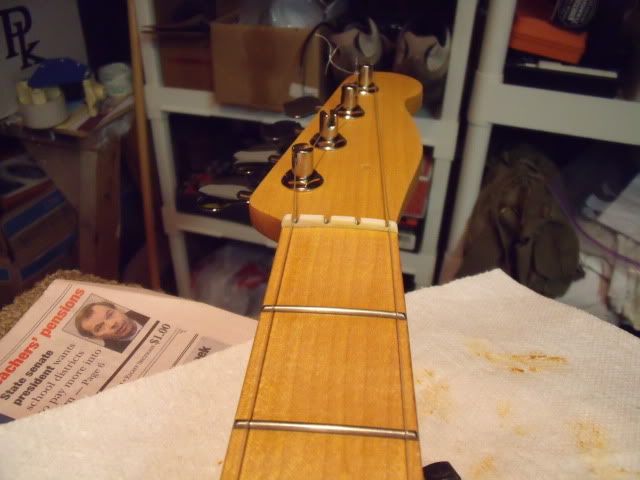
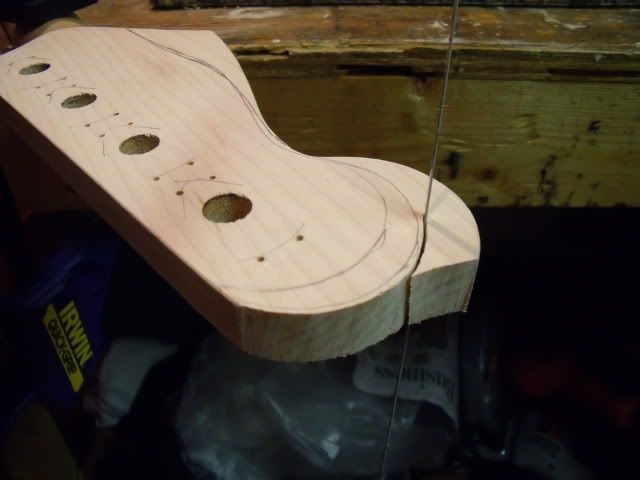
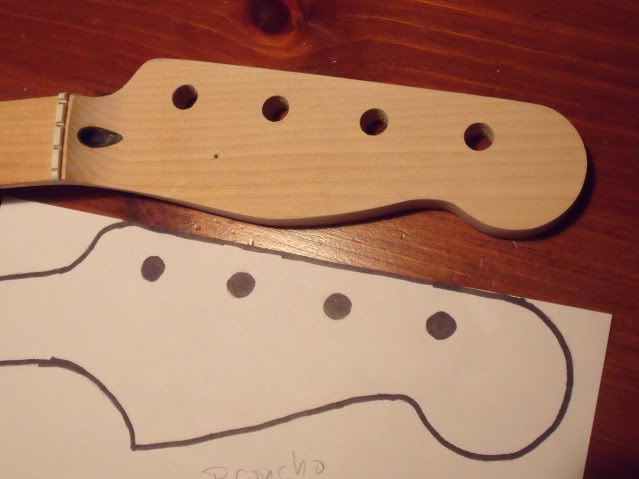
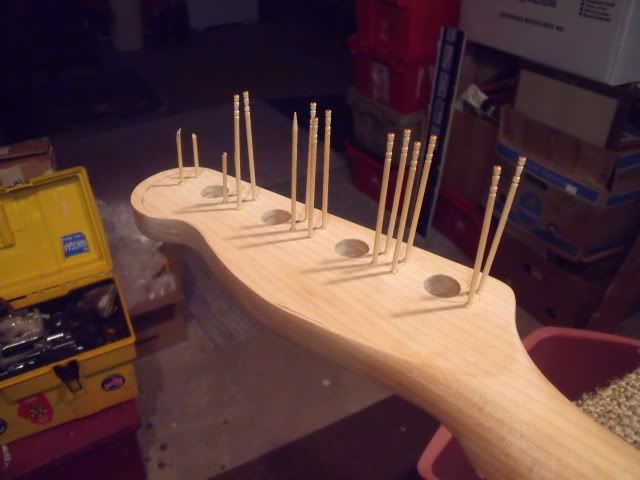
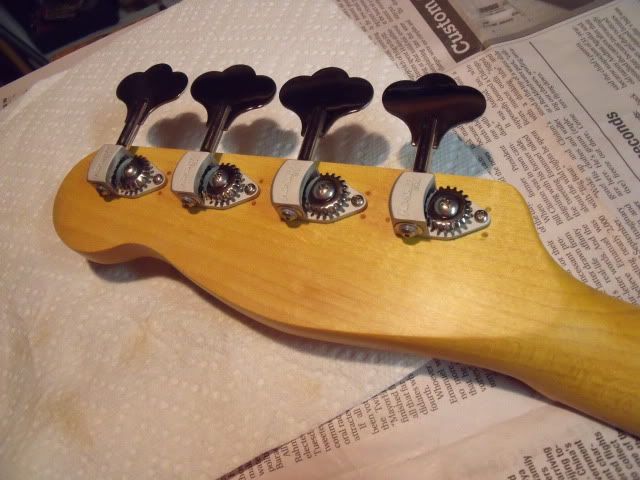
For the neck I am using a 20 fret Maple donor neck from a Squire Bronco. Its is a 30" scale that I picked up for $75.00. It was well worth that just for the neck. It's straight with well dressed frets The headstock will be re-profiled to the Telecaster style peghead.

Image


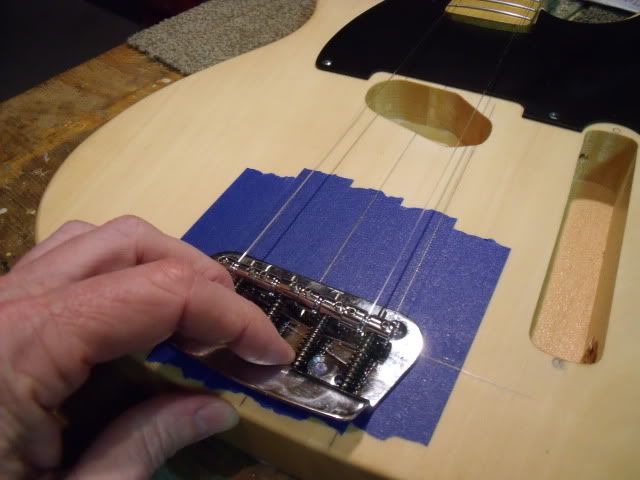
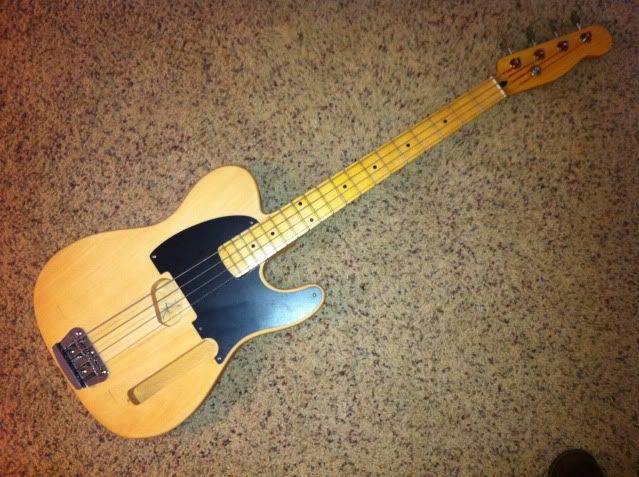
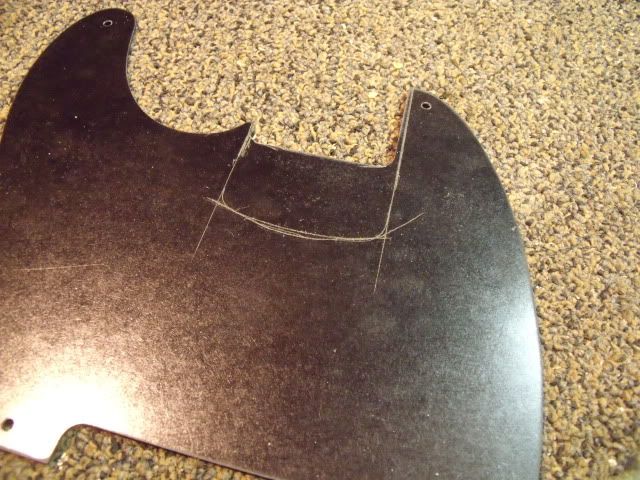
Anyway... because the neck is maple the "theme" is going to be a cross between a 51 Fender Precision Bass and a early 50's Telecaster. There is no neck pickup so I guess this makes it an Esquire Bass ( if Fender had built a 30" scale in 1951 or 52). It will have black Bakelite pickguard and a Butterscotch or Blond body. The bridge is a string through body Fender Musicmaster bridge with individual saddles. I will have to rout a little room for a Lindy Fralin Split Coil 51 Precision pickup in what is now the Tele bridge position. Moving the bridge back to make it a bass means the bridge position hole is a great spot for the 51 P pickup.


Image

I started this in January and am quite a bit further along than this I just wanted to keep the posts in some order resembling a timeline.

JR
User avatar
hotrodperlmutter
crescent fresh
Posts: 16665
Joined: Sat Apr 04, 2009 10:29 pm
Location: Overland Park, KS, USA

Post by hotrodperlmutter »

looks like a cool project. i can't wait to see what you do with it.

doing a standard tele/esquire guard or something more imaginative?

i still want to bang the shit out of this one:

Image
dots wrote:fuck that guy in his bunkhole.
Rotor
.
.
Posts: 13
Joined: Mon Oct 25, 2010 1:46 am
Location: IL

Post by Rotor »

hotrodperlmutter
It will be a Rat Rod'ish homage to 50's tele's and Precisions with an Oil finish and Bakelite guard.

__________________________________

To get the neck to seat deep enough in the body I chiseled through the bottom of the neck pocket in to the space where a tele neck pickup would be.

.
Image
.
Image
.
Image
.
I had to open it up just a C hair to get a nice tight fit on the Bronc neck.
.
Image
.

The neck is next.

JR
User avatar
Haze
.
.
Posts: 4924
Joined: Tue Jan 15, 2008 4:27 am
Location: Tulsa, OK
Contact:

Post by Haze »

My god I want to build one of these
User avatar
h8mtv
.
.
Posts: 1020
Joined: Mon Apr 11, 2011 1:35 pm
Location: Virginia

Post by h8mtv »

Wow, great job.
User avatar
StevePirates
.
.
Posts: 689
Joined: Sat Mar 24, 2007 4:00 am
Location: Reno

Post by StevePirates »

Sorry if I missed it elsewhere, but do you have plans for the Bronco body?
Rotor
.
.
Posts: 13
Joined: Mon Oct 25, 2010 1:46 am
Location: IL

Post by Rotor »

StevePirates wrote:Sorry if I missed it elsewhere, but do you have plans for the Bronco body?
Steve. No plans yet but I'm holding onto it waiting for inspiration.

_______________________________________________________

Time to re-profile the peghead.
.
Image
.
There is just enough meat in the right places to get a 51 P bass/ Tele style headstock. I tweaked the profile a just little from the template. The Bronc peg head is way to long for it's own good. I need to lose 1/2 an inch to get this thing into a baritone guitar case.


It was roughed out with a coping saw and sanded the edges to 80 grit. I have to open up the tuner holes from 3/8 to 9/16 to accommodate the bushings on the replacement tuners. I'll finish sand after that step.

Image
.
Image
.


Now Plug the holes from the stock Squire tuners. The new tuners will be lightweight types to stave off neck dive. I dyed the neck a shade with amber dye to give it a bit more of vintage tint. final finish for the neck is Tung oil for warmth and then Tru Oil that has poly in it to seal it. It has a nice satin feel that won’t get sticky.
.
Image
.

All finished with lightweight tuners installed.
.
Image
.

JR
User avatar
othomas2
.
.
Posts: 4026
Joined: Thu Apr 20, 2006 11:35 pm
Location: London

Post by othomas2 »

Wow awesome work, I have a feeling this is gonna turn out just lovely.
User avatar
Ankhanu
.
.
Posts: 2995
Joined: Tue Nov 10, 2009 4:51 pm
Location: Nova Scotia
Contact:

Post by Ankhanu »

This is looking awesome. Love it.
ekwatts wrote:That's American cinema, that is. Fucking sparkles.
Donate to Ankhanu Press
User avatar
Thom
lamp
Posts: 6999
Joined: Thu Apr 20, 2006 8:23 am
Location: Exeter, UK

Post by Thom »

othomas2 wrote:Wow awesome work, I have a feeling this is gonna turn out just lovely.
+1 Loving it so far.
User avatar
sholkham
.
.
Posts: 835
Joined: Sun Feb 13, 2011 9:11 pm
Location: S.E. UK

Post by sholkham »

looks cool, also that fender tele-bass with the chrome humbuckers looks insane, is that a Japan model?
User avatar
stewart
Cunning Linguist
Posts: 17644
Joined: Mon Jul 14, 2008 7:33 pm
Location: Edinburgh, Scotland
Contact:

Post by stewart »

mad skillz. interested in seeing the finished result. go swifty, like a young gazelle.
Image
Rotor
.
.
Posts: 13
Joined: Mon Oct 25, 2010 1:46 am
Location: IL

Post by Rotor »

OK, time to get on with pre-assembly.

I am using a Bakelite pickguard and will have to lengthen the neck pocket opening to account for the neck being so much further into the body. This one came out OK but it's a little to sloppy so there will be another. (maybe red tortoise shell)
.
Image.

The next step is to locate the bridge at the right distance to reach the 30" scale. It must also be properly centered so the strings are spaced evenly on the fretboard. Must find the center line.


Before I took the Bronco apart it took the critical measurements from the front of the nut to the bridge saddles. I transferred those to the blue tape.
.
Image.

I am stringing fishing line to get the bridge in just the right spot. Once I mark the spots on the tape I can drill pilot holes for the mounting screws.

.
Image
.
Image
.
Image
.

.
The Musicmaster bridge is a string through body design and not having a drill press makes getting the holes evenly spaced on the back a little more difficult. To get them close I drilled 1 and 4 string holes all the way through. The hole for the 2nd and 3rd string was only drilled a 1/2 inch deep from the top. I flipped the body over and used the bridge as a template and marked and drilled the 2nd and 3rd string centers based on where 1 and 4 emerged. When I open up the holes in the back the 2nd and 3rd string holes in the back will meet the ones from the front and the pattern in the back will be as evenly spaced as I can make it.

I counterbored the holes in the back to uniform depth to use some long bass ferules I found. The short ones came with the musicmaster bridge.
.
Image
.
.
Image
.
Image
.
.
Drilling that hole for the bridge ground wire was a nail biter. A footlong bit and I made it just to the bottom of the control cavity without hitting any of the screw holes. I thought about going to the cavity via the endpin and the dropping a hole to it from under the bridge and them plugging the endpin hole. In the end I just did the hole straight from the bridge.

Image
.
.
Image
.


Now I have the bridge installed and I can string this thing up to work on the Pickup location and angle. This is also the first chance to get a feel for it and I like it. The shorty feels great. Low string tension and easy spacing between positions. The tone was lively and it intonated just fine so the bridge location is right. I did have to use a neck shim to raise the neck a little so the bridge saddles were not bottomed out.
.
Image
.
...........Next is finishing the body and I can tell the sealer that is on this cheap imported body is going to be tough to sand out.


JR
User avatar
serfx
ss.o bastard son
Posts: 6411
Joined: Tue Jan 15, 2008 11:34 pm
Location: Edmonton Alberta
Contact:

Post by serfx »

looking great!
User avatar
stewart
Cunning Linguist
Posts: 17644
Joined: Mon Jul 14, 2008 7:33 pm
Location: Edinburgh, Scotland
Contact:

Post by stewart »

nice work so far. interested to see how it balances without a proper top horn though.
Image
User avatar
Sparky
.
.
Posts: 662
Joined: Sun Oct 29, 2006 4:03 pm
Location: Hartford, CT

Post by Sparky »

Woahhh! That's a beaut of a project! Can't believe you made it look so seamless! Good idea with the fishing line, when I did my Bigsby I just eyeballed it. :oops:

So are you going to modify the upper horn? It might be badass, but probably not necessary especially considering all that could go wrong. It's a one-of-a-kind but still clearly Fender. I dig it!
User avatar
endsjustifymeans
Grown Up Punk
Posts: 19442
Joined: Tue Feb 10, 2009 4:02 pm
Location: Ball So Hard University

Post by endsjustifymeans »

I think we should be Fender's new R+D dept.
dots wrote:society is crumbling because of asshoels like ends
brainfur wrote:I'm having difficulty reconciling my desire to smash the state & kill all white people with my desire for a new telecaster
User avatar
Ankhanu
.
.
Posts: 2995
Joined: Tue Nov 10, 2009 4:51 pm
Location: Nova Scotia
Contact:

Post by Ankhanu »

stewart wrote:nice work so far. interested to see how it balances without a proper top horn though.
Being shortscale, I think the balance might be a lesser issue than with a standard Tele bass. It might be a little neck heavy, but, personally, I don't think it would be bad enough to warrant modification.
endsjustifymeans wrote:I think we should be Fender's new R+D dept.
Many better ideas than what Fender comes out with these days.
ekwatts wrote:That's American cinema, that is. Fucking sparkles.
Donate to Ankhanu Press
Rotor
.
.
Posts: 13
Joined: Mon Oct 25, 2010 1:46 am
Location: IL

Post by Rotor »

Sparky wrote:Woahhh! That's a beaut of a project! Can't believe you made it look so seamless! Good idea with the fishing line, when I did my Bigsby I just eyeballed it. :oops:

So are you going to modify the upper horn? It might be badass, but probably not necessary especially considering all that could go wrong. It's a one-of-a-kind but still clearly Fender. I dig it!
Thanks. I had heard others use the fishing line trick. It works good. Nothing is realy new.

I think Stewart was refering to the fact that it does not have a top horn like a 51 P bass. I will not be making a horn there.
I dont think neck dive will be a problem. The length is 4 inches shorter than a 51 P and the ultralight tuners will avoid the dive. If I have to I will add lead to the body. I don't think I will have too.
User avatar
endsjustifymeans
Grown Up Punk
Posts: 19442
Joined: Tue Feb 10, 2009 4:02 pm
Location: Ball So Hard University

Post by endsjustifymeans »

Warning you now, I'm buying this from you at some point.

;)
dots wrote:society is crumbling because of asshoels like ends
brainfur wrote:I'm having difficulty reconciling my desire to smash the state & kill all white people with my desire for a new telecaster