Page 1 of 1
Painting Matching Headstocks
Posted: Sat Feb 25, 2012 4:30 am
by taylornutt
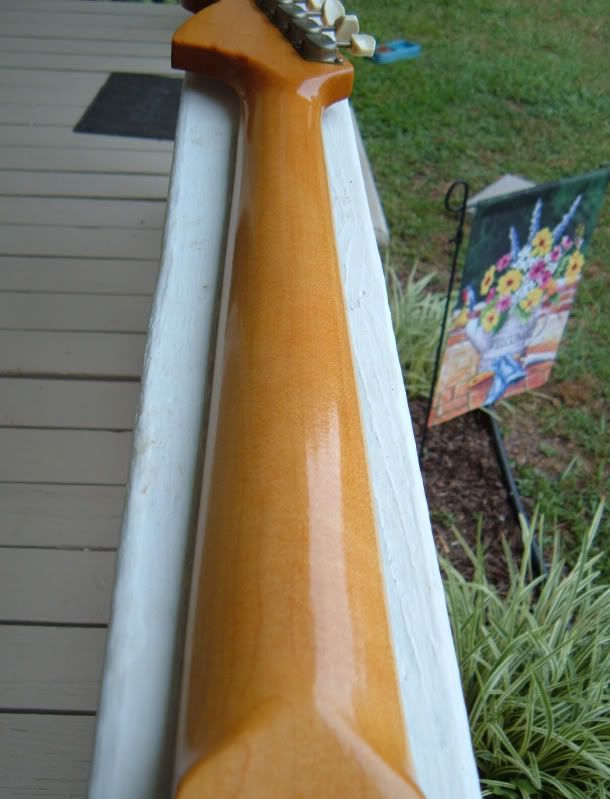
My Jazzmaster build is starting to come together and I wanted to try my hand at painting a matching headstock. I have refinished my Mullet-stang neck so I feel comfortable finishing the neck.
The neck I have is basically an unfinished Allparts type neck. I have another neck that I am going to practice on before painting the real neck.
This is my game plan:
1)Prep the wood
2)Paint the face of the headstock
3)Clear nitro the headstock
4)Lite sanding
5)Spray tinted clear on the rest of the neck
6)Apply decals and clear nitro over the decals
6)Sand and polish
Does this sound like the right order ? I would appreciate any advice or suggestions from anyone who has done this before.
Posted: Sat Feb 25, 2012 7:09 am
by Addam
I did a matching headstock on a cheapo stratalike.
OG finish was satin, so I tried to scrimp by doing the headstock colour first, it just bled around the edge of the masking tape.
Whatever I tried, sanding it level etc, didn't work.
In the end I sanded it all off, did a coat of clear gloss.
Then masked off the face, shot my colour, then sprayed more clear.
I got a pretty respectable end result.
Posted: Sat Feb 25, 2012 2:55 pm
by cooter
+1 on what AddamInsane said. Raw wood will bleed the color.
Here's how I do a matching headstock neck on an unfinished neck.
I usually put a good coat of clear on the neck first. Including the headstock. Masking off only the face of the fretboard and the nut.
Then I spray the the tinted stuff 'til I get it the shade I want. I won't bother spraying the headstock with tint but I don't mask it off either.
Next I'll spray a couple of light coats to lock in the tint and I put it up for a few days.
After it's dryed a few days I'll mask off the edges of the headstock and the rosewood on the headstock side of the nut with blue painters tape,
wrap paper around the rest of the neck so only the face of the headstock is exposed.
Keep checking the headstock edge of the painters tape to make sure it hasn't pulled away from the neck. I usually run my
thumbnail over the tape to make sure it's got a good seal.
I'll put a couple of light coats of white primer on the headstock until it looks nice an even.
Once that's dry I put my color coats on until it's done. As soon as the color is dry enough to remove the tape I remove it.
I don't like for the tape to stay on very long so I try to do the primer and color in one afternoon and remove the tape promptly
after it's dry.
Then you should apply your decal. Lock it in with a few mist coats of clear.
Next is more clear coats with only the face of the fretboard and the nut masked off. I leave the rosewood on the headstock side of
the neck exposed so the clear covers it as well.
Always allow drying time between coats.
Posted: Sat Feb 25, 2012 3:40 pm
by taylornutt
Do you have any pics?
That is really helpful info. If I end up attempting a sparkle finish, I am going to use Black primer before I spray the paint.
Posted: Sat Feb 25, 2012 7:02 pm
by cooter
taylornutt wrote:Do you have any pics?
That is really helpful info. If I end up attempting a sparkle finish, I am going to use Black primer before I spray the paint.
I thought you needed silver or gold as a base for a sparkle finish. I've read that candy apple red has a silver base.
I've never done a sparkle other than LPB and I used a white primer as a base on that one because that was what the
Reranch website suggested.
Sorry, I don't have any pictures of the process but here's a few finished pics.
This is a reliced comp mustang neck. It was originally comp blue but someone had sprayed the headstock
with dark blue paint so it had to be completely stripped.

Here's the Swinger neck I made from a Mini Strat neck.

Here's the back of my '75 Musicmaster neck I refinished. The headstock had been refinished
when I bought it so I refinished the whole neck.
Posted: Sat Feb 25, 2012 7:14 pm
by taylornutt
The reason I thought about using a black primer is I was going to use Blue flake and if there were any small gaps the black would show through. I found a guy online doing some wild flake finishes and he was using black primer. Of course he was sprinkling the flakes by hand.
The good about using the practice neck is I figure out what works before I screw up the good neck.
Neck Refinish question: When I am spraying the nitro clear on the neck, do I leave the white binding exposed or do I cover it up? Do I want to get clear on the white binding?
Posted: Sat Feb 25, 2012 11:53 pm
by cooter
taylornutt wrote:Neck Refinish question: When I am spraying the nitro clear on the neck, do I leave the white binding exposed or do I cover it up? Do I want to get clear on the white binding?
I normally clear the binding. I sometimes use tint on the binding and nut if I want it to look aged.
Posted: Sun Feb 26, 2012 1:07 am
by SKC Willie
cooterfinger wrote:taylornutt wrote:Neck Refinish question: When I am spraying the nitro clear on the neck, do I leave the white binding exposed or do I cover it up? Do I want to get clear on the white binding?
I normally clear the binding. I sometimes use tint on the binding and nut if I want it to look aged.
most guitars I've played had clear over the binding. actually, I'm fair certain all guitar w/ binding I played had clear over the binding
ASK PAUL
Posted: Wed Feb 29, 2012 4:30 am
by taylornutt
Will tinted clearcoat cause major discoloration of the binding? I am going to be using tinted clear coat for the neck and I don't want to overly tint the binding. I might have to lay down some early clear passes and then cover up the binding so it doesn't get too much tint.
Posted: Fri Mar 02, 2012 1:15 pm
by JohnnyTheBoy
Good post guys!
I shall be attempting this when my neck is finished...although I've used ash and will need to sand n seal it before
Laying the primer and colour down...
Interesting read, with great tips from Coot...cheers!
Hope your headstock turns out nice Mr Nutt!
Posted: Fri Mar 02, 2012 3:10 pm
by SKC Willie
yes, it will tint the binding.
but if you're trying to make it look like a vintage tinted neck, wouldn't the sun tint the clear coat over the binding just like it tints the clear on the back of the neck?
Posted: Fri Mar 02, 2012 5:33 pm
by Thomas
On my vintage B+B Jaguar the clear coat on the binding has darkened more than the clear coat on the neck, however the clear coat has almost completely worn off anywhere your hand would touch it. So it's basically white apart from at the nut and at the heel where it looks very dark.
I'd say shoot it then buff most of the tinted clear off. I can take some photos if you like?
Posted: Fri Mar 02, 2012 5:55 pm
by taylornutt
That would be much appreciated.
I also thought with regards to the binding I could shoot the neck and binding with clear, mask the binding and then shoot the tinted nitro to darken the wood and then wet sand it to level it out.
Posted: Sat Mar 03, 2012 1:59 pm
by Thomas
That sounds like the sensible option.